Custom Module & Display Object Configurators
The new custom module (display object) code conventions introduced in Mura 7 also include a markup standard for consistency and ease of development.
Configurator Usage
In addition to the default display object types, additional custom display objects can be added to Mura's inline editor for placement on the page. The configurator manages any special settings, values or controls for that particular usage of the display object, and is displayed in the sidebar in the front end editing view.
When coding the "configurator.cfm" rendering template for any custom display object, these conventions should be used to provide optimal results.
Basic Input / Label Grouping
Mura's front-end editor automatically provides the outer markup for any configurator forms rendered in the sidebar, including the html <form> wrapper. The contents of a configurator.cfm file consist of a few basic form elements to create the specific controls for the relevant display object.
Within the <cf_objectconfigurator> tag (see overview example below), each form input is paired with its corresponding <label> element, inside a wrapper with the "mura-control-group" class. (This is similar to standard Admin Form markup conventions.)
For example, a standard text input:
<!--- Text --->
<div class="mura-control-group">
  <label>Text</label>
  <input type="text" name="exampletext" class="objectParam" value="#esapiEncode('html_attr',objectParams.exampletext)#"/>
</div>
Note the use of the objectParam class on the input itself, which is required for editing functionality, along with the dynamic value for the input. These conventions are used universally when creating custom display object configurators.
Standard Input Types
In addition to basic text inputs, other standard form elements can be used, with a similar syntax.
For example, a textarea:
<!--- TextArea --->
<div class="mura-control-group">
  <label>Text Area</label>
  <textarea name="exampletextarea" class="objectParam">#objectParams.exampletextarea#</textarea>
</div>
A select box:
<!--- Select --->
<div class="mura-control-group">
  <label>Select</label>
  <select class="objectParam" name="exampleselect">
     <option value="red"<cfif objectParams.exampleselect is 'red'> selected</cfif>>Red</option>
     <option value="green"<cfif objectParams.exampleselect is 'green'> selected</cfif>>Green</option>
     <option value="blue"<cfif objectParams.exampleselect is 'blue'> selected</cfif>>Blue</option>
  </select>
</div>
Configurator elements with variables or automated values may also be used. For example, a select box with dynamic options via cfloop:
<!--- Select --->
<div class="mura-control-group">
  <label>Select</label>
  <select class="objectParam" name="exampleselect">
    <option value="">Choose a Value</option>
    <cfloop list="1,2,3" item="i">
      <option <cfif objectParams.exampleselect eq i>selected </cfif>value="#i#">#i#</option>
    </cfloop>
  </select>
</div>
Checkbox and Radio Inputs
One or more checkbox inputs can be grouped inside the same "mura-control-group" wrapper.
A standard <label> element can be used to describe the group, followed by any number of checkbox inputs, grouped in a "checkbox-group" container. Each input is wrapped with a label element using the "checkbox" class.
<!--- Checkboxes --->
<div class="mura-control-group">
  <label>Checkboxes</label>
  <div class="checkbox-group">
  <cfloop list="Red,Green,Blue" item="i">
    <label class="checkbox"><input type="checkbox" class="objectParam" name="examplecheckbox" value="#lcase(i)#"<cfif listFindNoCase(objectParams.examplecheckbox,i)> checked</cfif>>#i#</label>
  </cfloop>
  </div>
</div>
Radio buttons use a similar syntax, nested inside a "radio-group" container, and labels with the "radio" class.
<!--- Radio Group --->
<div class="mura-control-group">
  <label>Radio Buttons</label>
  <div class="radio-group">
    <label class="radio"><input type="radio" class="objectParam" name="exampleradio" value="true" <cfif objectParams.exampleradio> checked</cfif>/>Yes</label>
    <label class="radio"><input type="radio" class="objectParam" name="exampleradio" value="false" <cfif not objectParams.exampleradio> checked</cfif>/>No</label>
  </div>
</div>
Configurator Overview
When utilizing these options in a single configurator.cfm file, your markup will look something like this:
<!--- set defaults for form values --->
<cfsilent>
  <cfparam name="objectParams.exampletext" default="">
  <cfparam name="objectParams.exampletextarea" default="">
  <cfparam name="objectParams.exampleselect" default="">
  <cfparam name="objectParams.exampleradio" default="false">
  <cfparam name="objectParams.examplecheckbox" default="">
  <cfparam name="objectParams.examplefile" default="">
</cfsilent>

<!--- cf_objectconfigurator tag adds default inputs --->
<cf_objectconfigurator>
  <cfoutput>

    <!--- Text --->
    <div class="mura-control-group">
      <label>Text</label>
      <input type="text" name="exampletext" class="objectParam" value="#esapiEncode('html_attr',objectParams.exampletext)#"/>
    </div>

    <!--- TextArea --->
    <div class="mura-control-group">
      <label>Text Area</label>
      <textarea name="exampletextarea" class="objectParam">#objectParams.exampletextarea#</textarea>
    </div>

        <!--- Select --->
        <div class="mura-control-group">
         <label>Select</label>
         <select class="objectParam" name="exampleselect">
          <option value="">Choose a Value</option>
          <cfloop list="1,2,3" item="i">
           <option <cfif objectParams.exampleselect eq i>selected </cfif>value="#i#">#i#</option>
          </cfloop>
         </select>
        </div>

    <!--- Checkboxes --->
    <div class="mura-control-group">
      <label>Checkboxes</label>
      <div class="checkbox-group">
      <cfloop list="Red,Green,Blue" item="i">
      <label class="checkbox"><input type="checkbox" class="objectParam" name="examplecheckbox" value="#lcase(i)#"<cfif listFindNoCase(objectParams.examplecheckbox,i)> checked</cfif>>#i#</label>
      </cfloop>
      </div>
    </div>

    <!--- Radio Group --->
    <div class="mura-control-group">
      <label>Radio Buttons</label>
      <div class="radio-group">
        <label class="radio"><input type="radio" class="objectParam" name="exampleradio" value="true" <cfif objectParams.exampleradio> checked</cfif>/>Yes</label>
        <label class="radio"><input type="radio" class="objectParam" name="exampleradio" value="false" <cfif not objectParams.exampleradio> checked</cfif>/>No</label>
      </div>
    </div>

        <!--- Custom CKFinder file selector --->
        <div class="mura-control-group">
            <label>Select File</label>
            <input name="myfile" class="objectParam" value="#esapiEncode('html_attr',objectparams.examplefile)#"><br/>
            <button type="button" class="btn mura-ckfinder" data-target="myfile" data-completepath=false>Select File</button><br/>
        </div>

        <!--- Custom modal window w/ control button --->
        <div class="mura-control-group">
            <button type="button" class="btn" id="open-custom-modal">Open Modal</button>
        </div>
        <input name="trim-params" class="objectParam" type="hidden" value="true"/>
        <script>
            $(function(){
                $('##open-custom-modal').click(function(){
                    siteManager.openDisplayObjectModal('examples/modal.cfm');
                });
            });
        </script>

    </cfoutput>
</cf_objectconfigurator>
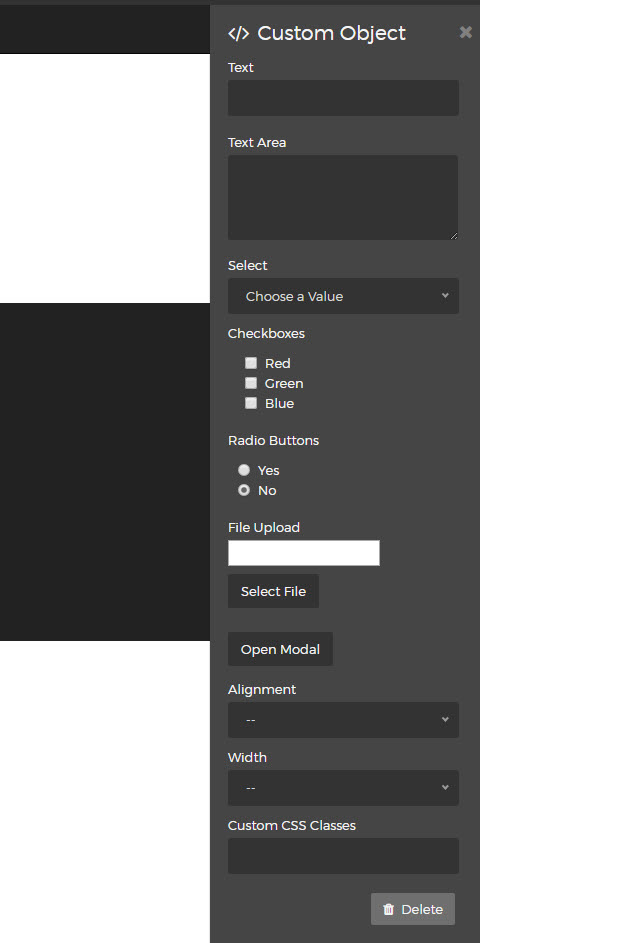
Rendering a configurator form looking something like this:

Note the additional "custom css classes" input. This is added automatically by Mura, with the supplied class names applied to the display object container.
For more about using custom display objects in Mura 7, see display objects documentation and getmura.com/blog/mura-cms-7-new-display-object-conventions/ .