Theme Layout Templates
As covered in The "themes" Directory section, themes may be located under one of the following directories:
- Global Themes
{context}/themes/- Themes located under the "Global" themes directory will automatically be available as a theme option for all sites under the same Mura instance.
- Site Themes
{context}/sites/{SiteName}/themes/- Themes located under a site's "themes" directory are available to the specified site, and/or any other sites sharing the same "Display Object Pool" as defined under Site Settings > Edit Settings > Shared Resources tab.
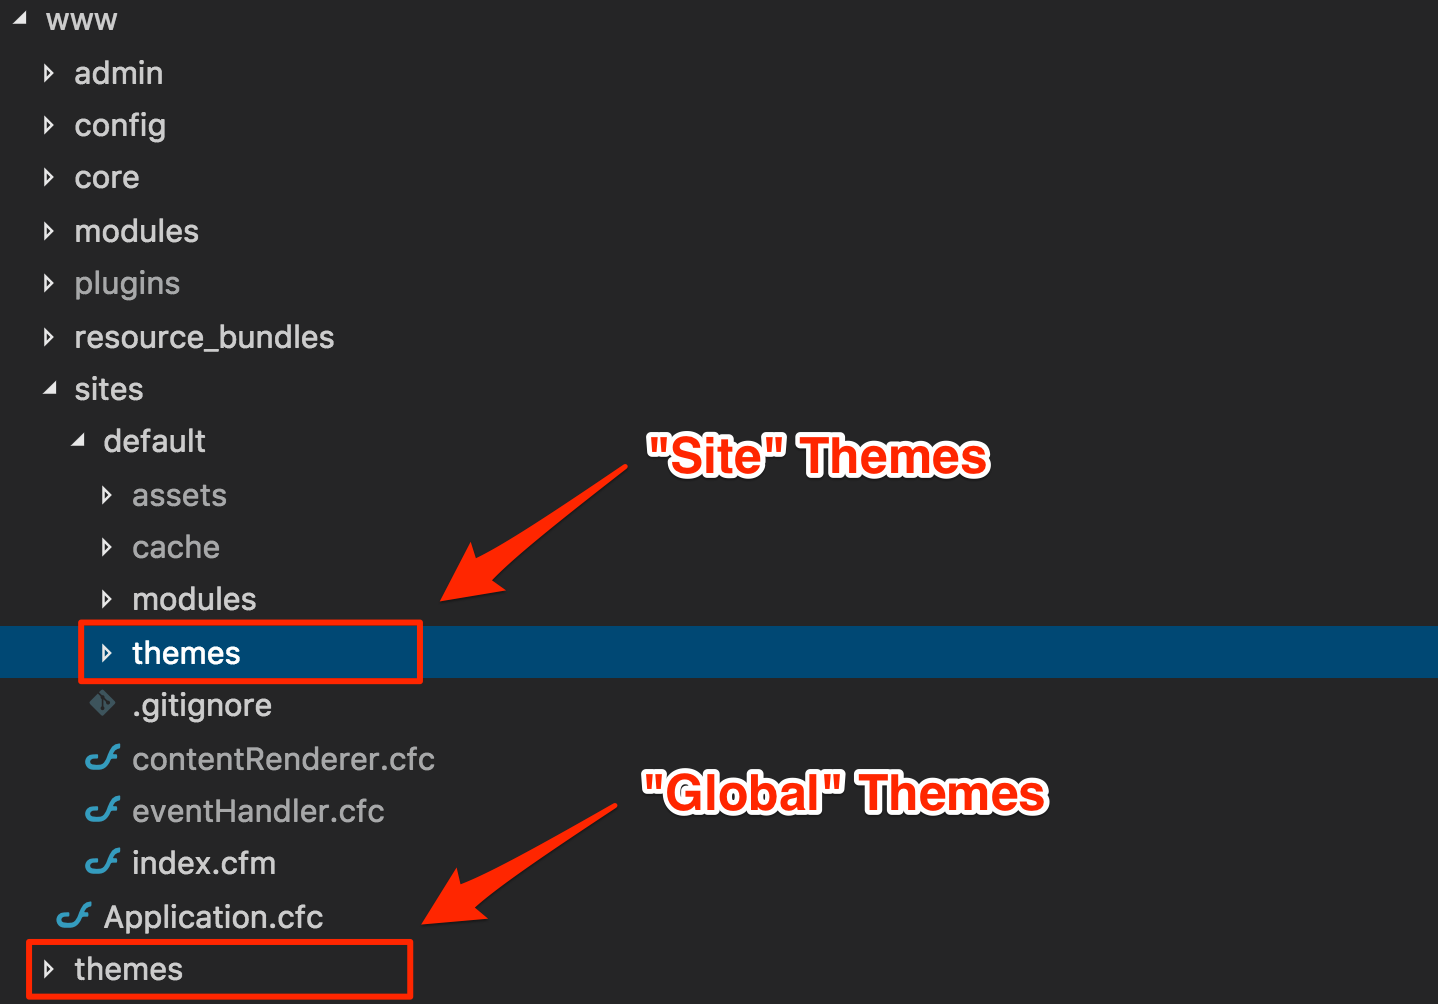
Mura automatically checks these "themes" directories for any subdirectories. If Mura discovers any subdirectories, it assumes it is a theme, and uses the name of each directory as the "Theme Name". The "Theme Name" will then be listed as an option for authorized administrators to apply as a theme to their site. You may have as many themes as you wish under a "themes" directory.
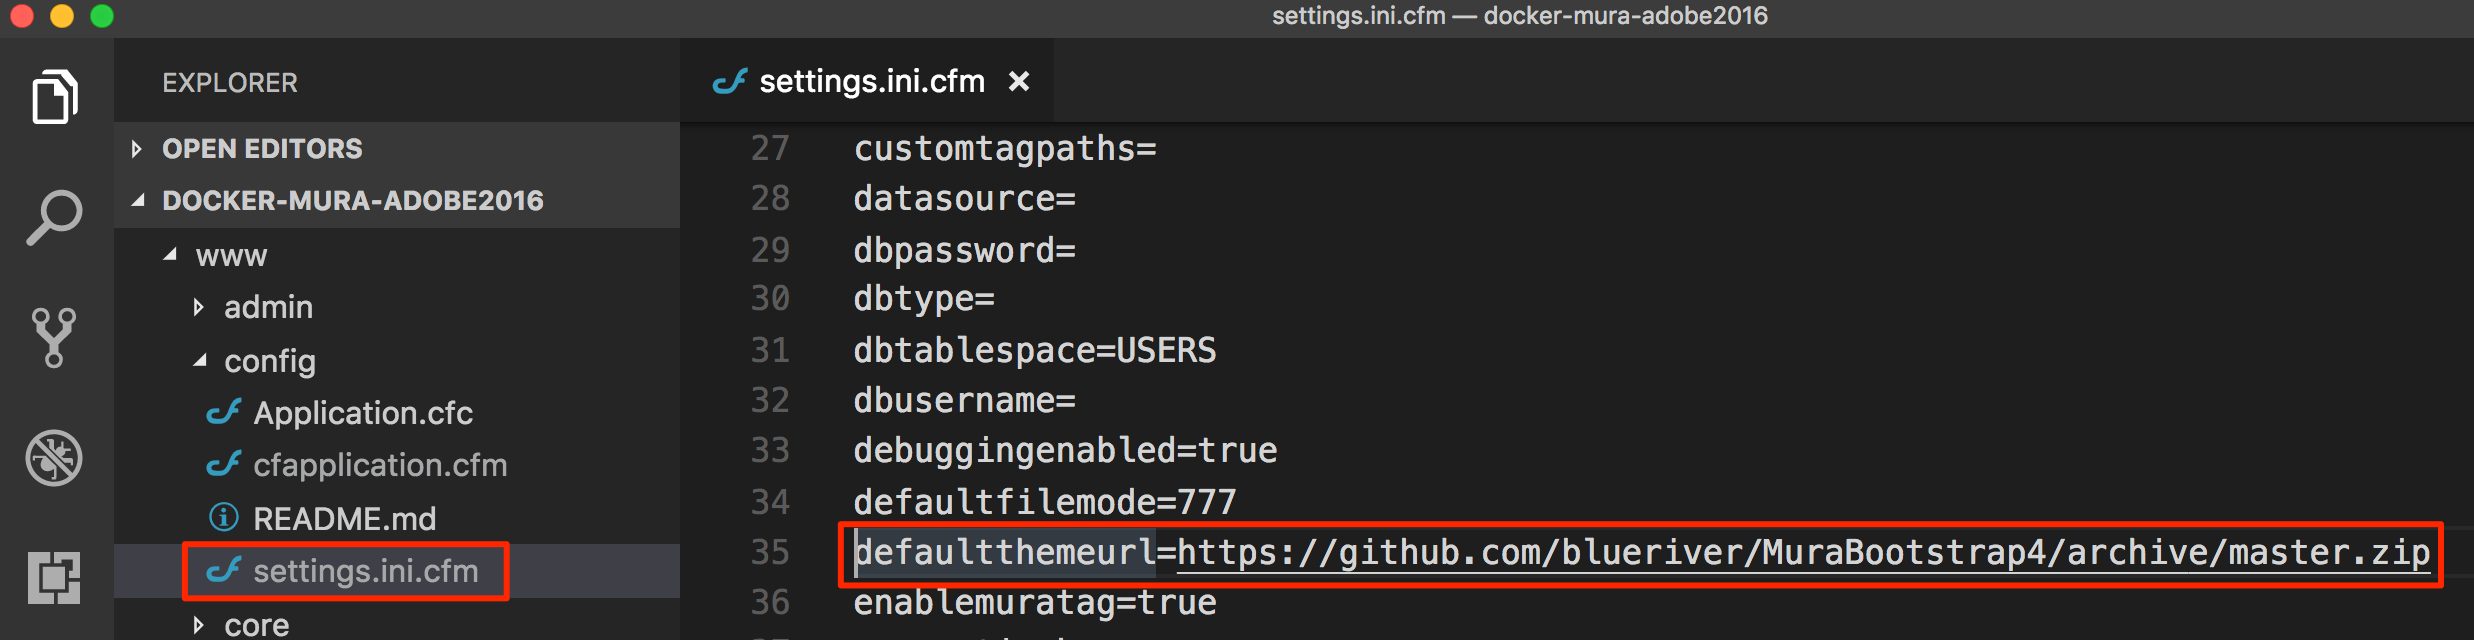
When Mura is first installed, if a theme does not exist under either of these directories, Mura will attempt to download a theme using the "defaultthemeurl" setting found in the {context}/config/settings.ini.cfm file, and will create a "Global" theme using "default" as the directory name, as well as the "Theme Name". As of version 7.1, the default setting for the "defaultthemeurl" is "https://github.com/blueriver/MuraBootstrap4/archive/master.zip".
Do not confuse this with a "Site Bundle". These are simply the layout templates, and related files necessary for the theme itself. In other words, it does not contain any "content." That said, a "Site Bundle" version of the default theme is available at https://github.com/blueriver/MuraBootstrap4Bundle. Please visit the Site Bundles section for more information.
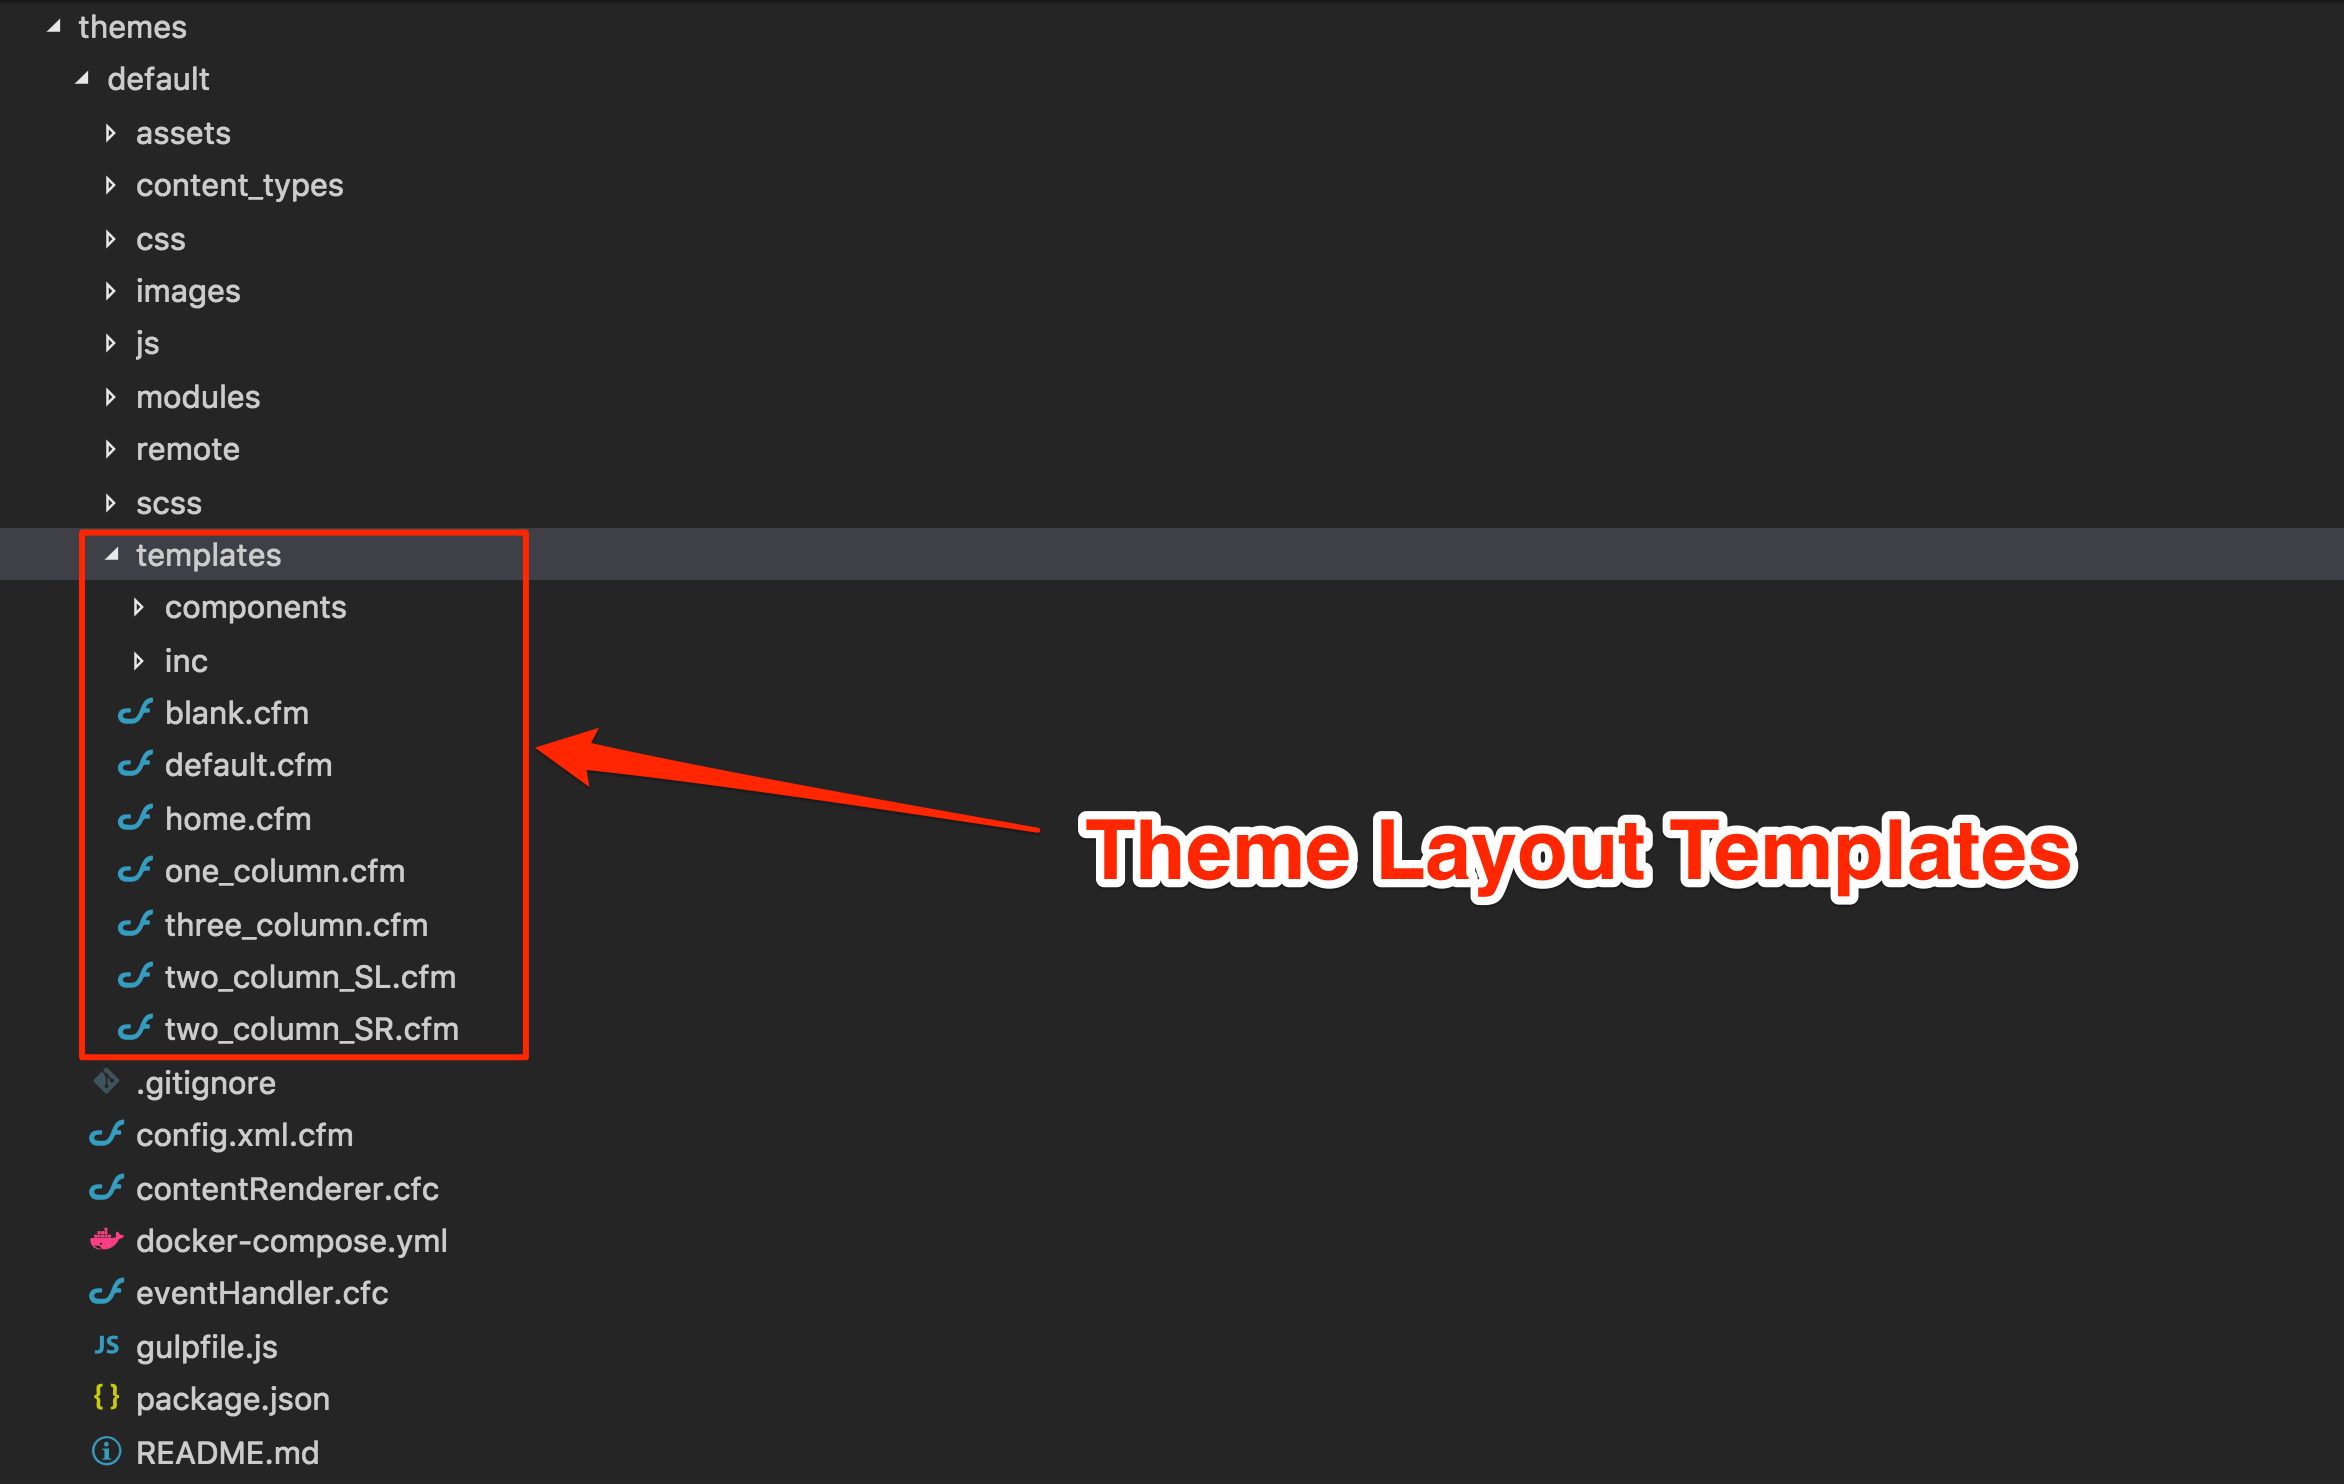
../{ThemeName}/templates/
The only "required" directory under a theme is the "templates" directory. This is also the directory where you will create and manage your theme-specific layout templates.
Visit the "How Do I Create Layout Templates?" section to learn more.
How Do I Create Layout Templates?
The great thing about working with Mura is, you can start off by creating layout templates just like you always have. Many theme developers begin by creating custom layouts using vanilla HTML, CSS, and JavaScript. Or, some theme developers begin by purchasing and/or downloading free templates from the web. The end result is typically a directory of HTML files, and subdirectories of the assets, images, and other related files.
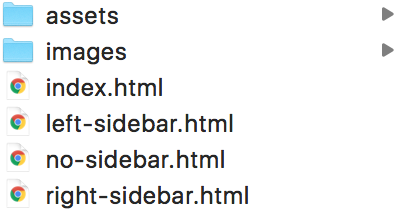
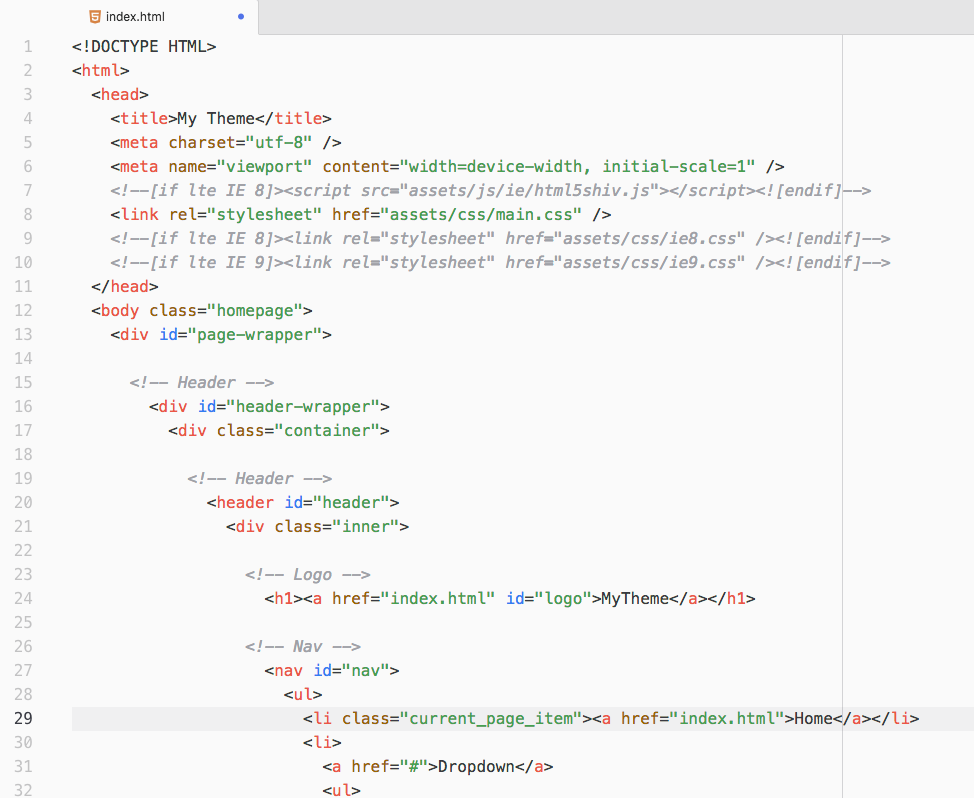
If we were to open one of the files from the example listed above, you would see that it's straight vanilla HTML.
So, there's no reason to change anything about the initial part of your theme development process.
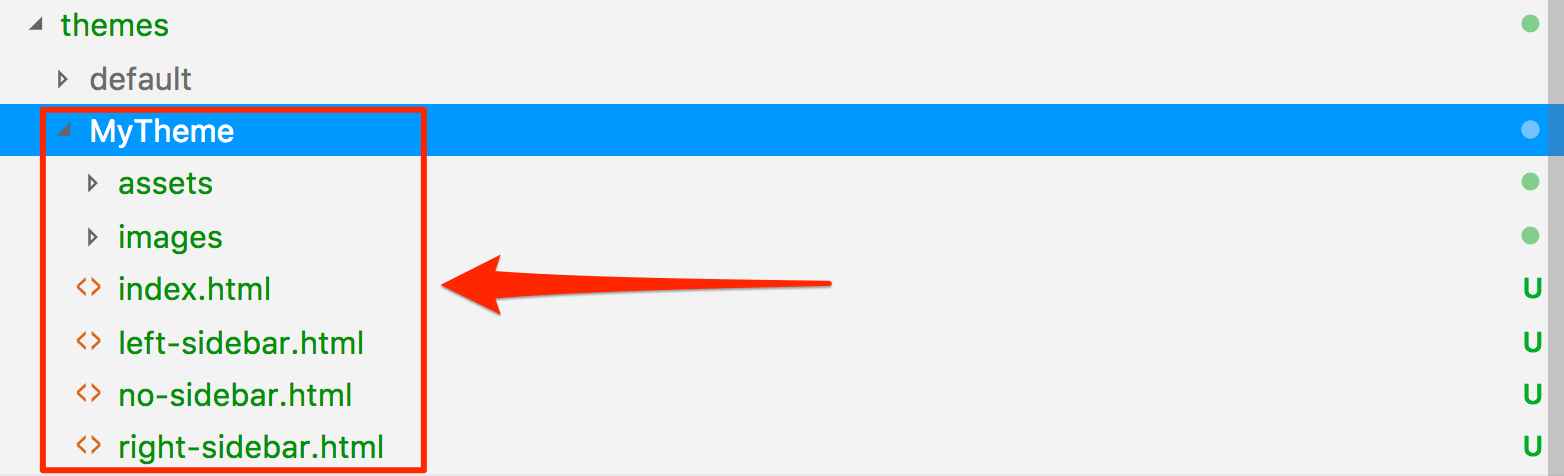
1. Move Your Theme to a "themes" Directory
Place your theme under a "themes" directory. For example, {context}/themes/{ThemeName} if you wish to create a "global" theme, or {context}/sites/{SiteID}/themes/{ThemeName}, if you only want the theme to be available for a specific site.
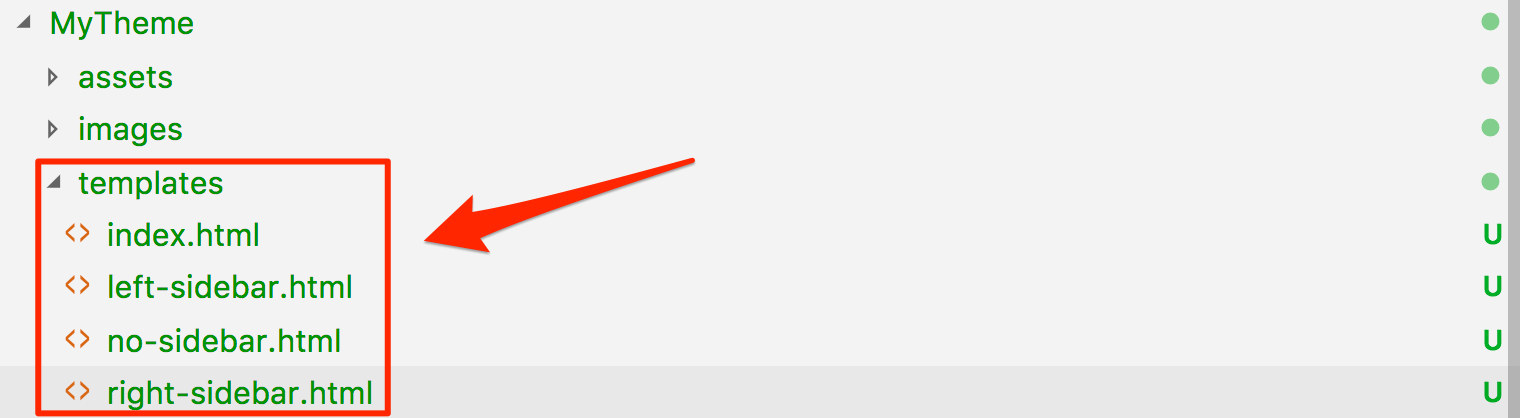
2. Create a "templates" Directory
The only required directory of a Mura theme is a "templates" directory. So, we'll need to create it, and then move our layout templates into it.
3. Rename ".html" Files to ".cfm"
Rename all of your layout templates from the ".html" file extension, to the ".cfm" file extension. As indicated by the ".cfm" file extensions, Mura uses ColdFusion Markup Language (CFML) as its server-side scripting language. Like many other web scripting languages, CFML augments standard HTML files with database commands, conditional operators, high-level formatting functions, and other elements to produce web applications. If you're interested in learning more about CFML, checkout https://helpx.adobe.com/support/coldfusion.html or http://learncfinaweek.com.
So, using our existing example files, our directory structure might look like the following illustration.
4. Create a "default.cfm" Layout Template
Remember, if Mura is unable to locate a currently assigned layout template, it will "fall back" to using the "default.cfm" layout template. So, it's good practice to simply have one created.

5. Use Commonly Used Layout Template Names
Listed below are the most commonly used layout templates in Mura. If you plan on distributing your theme, you might consider using this naming convention. This way, if an administrator swaps a theme, they won't necessarily have to go back through their entire website, and reapply new layouts to all of the pages and sections of their site.
- default.cfm
- This is the "default" layout template. If Mura is unable to locate a layout that has been assigned to a content item (e.g., the layout has been renamed, or removed), Mura will "fall back" to this layout. Using a simple line of code, you can easily "include" one of your other layouts to be used. For example,
<cfinclude template="two_column_SL.cfm">
- home.cfm
- The "home" layout is traditionally applied only to the "Home" page of the website.
- one_column.cfm
- This layout is used when you don't need any "sidebars" or other columns other than the main "body/content" area.
- three_column.cfm
- This layout accommodates a centered main "body/content" region, as well as a left sidebar, and a right sidebar.
- two_column_SL.cfm
- This layout has a main "body/content" region, and its sidebar to the left.
- two_column_SR.cfm
- This layout has a main "body/content" region, and its sidebar to the right.
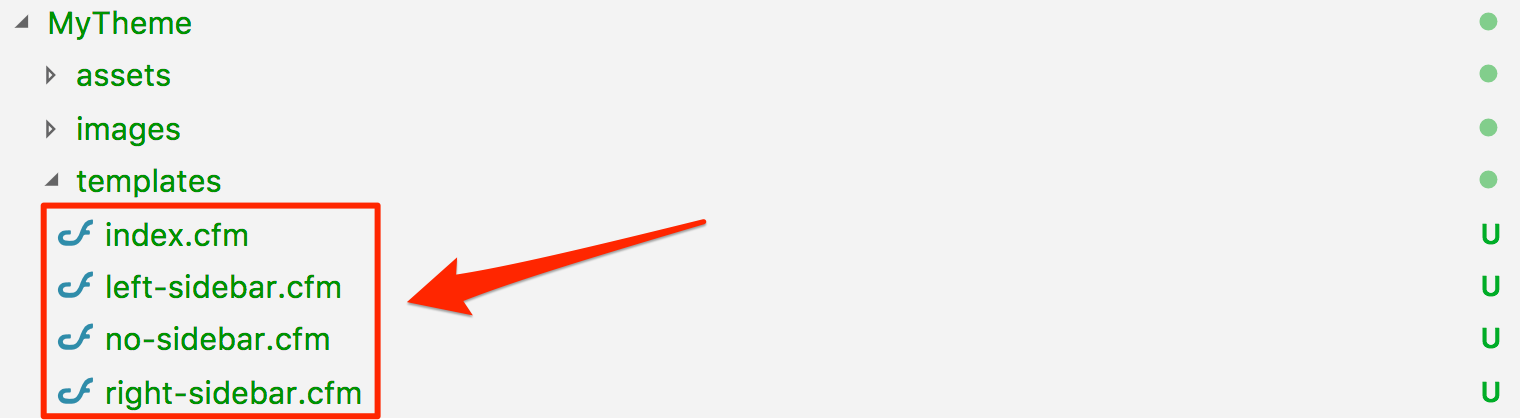
So, reviewing our example files, we should be able to rename example templates as follows:
| Original Name |
New Name |
| index.cfm |
home.cfm |
| left-sidebar.cfm |
two_column_SL.cfm |
| no-sidebar.cfm |
one_column.cfm |
| right-sidebar.cfm |
two_column_SR.cfm |
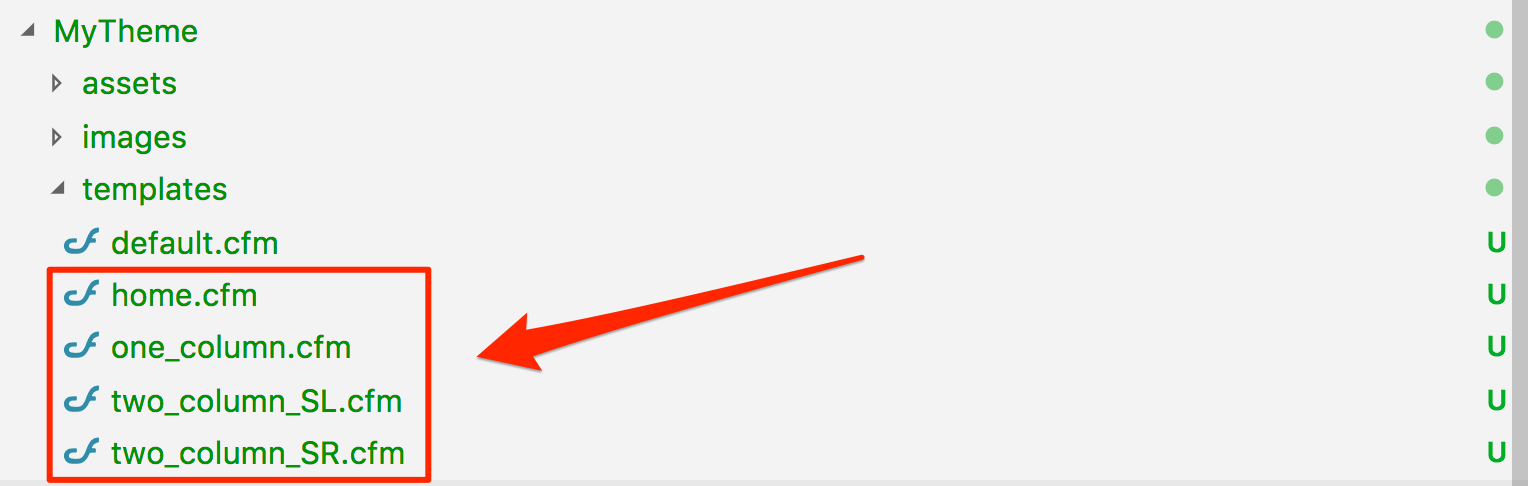
Since we have a "default.cfm" layout template, if the prior theme assignment was using a layout template that our new theme doesn't include, we could either make a new one, or just allow the "fall back" to occur, and rely on "default.cfm" to be used instead.
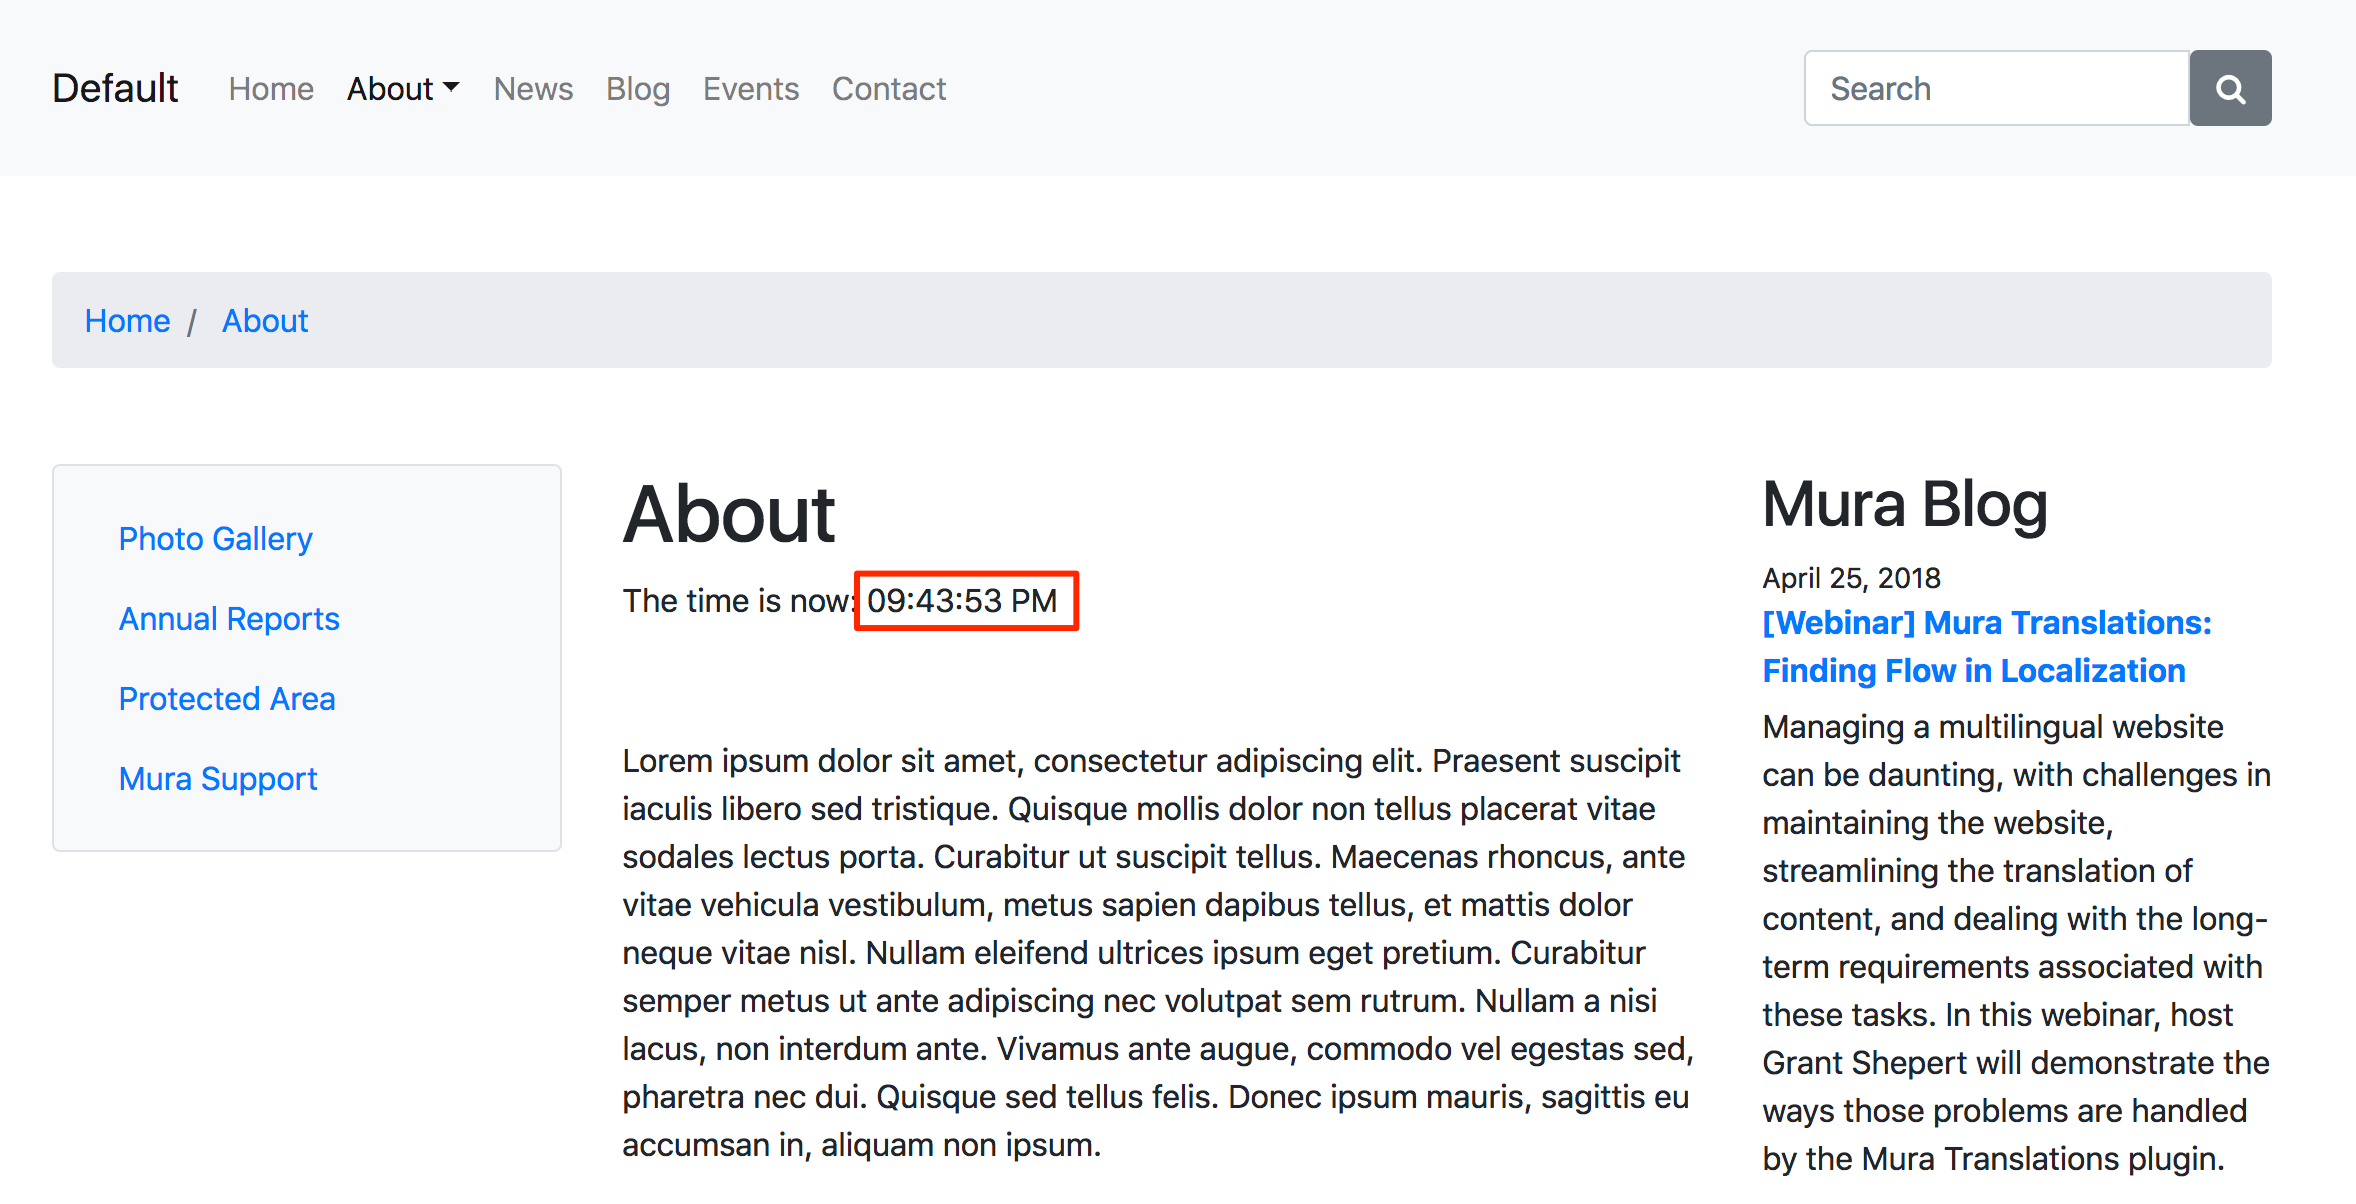
A common method used with the default.cfm layout template is to "include" your desired "default" layout template. For example, maybe you want the two_column_SL.cfm layout to be your default. The following illustration shows how you could do that.

Visit https://helpx.adobe.com/coldfusion/cfml-reference/coldfusion-tags/tags-i/cfinclude.html for more information about the <cfinclude> tag.
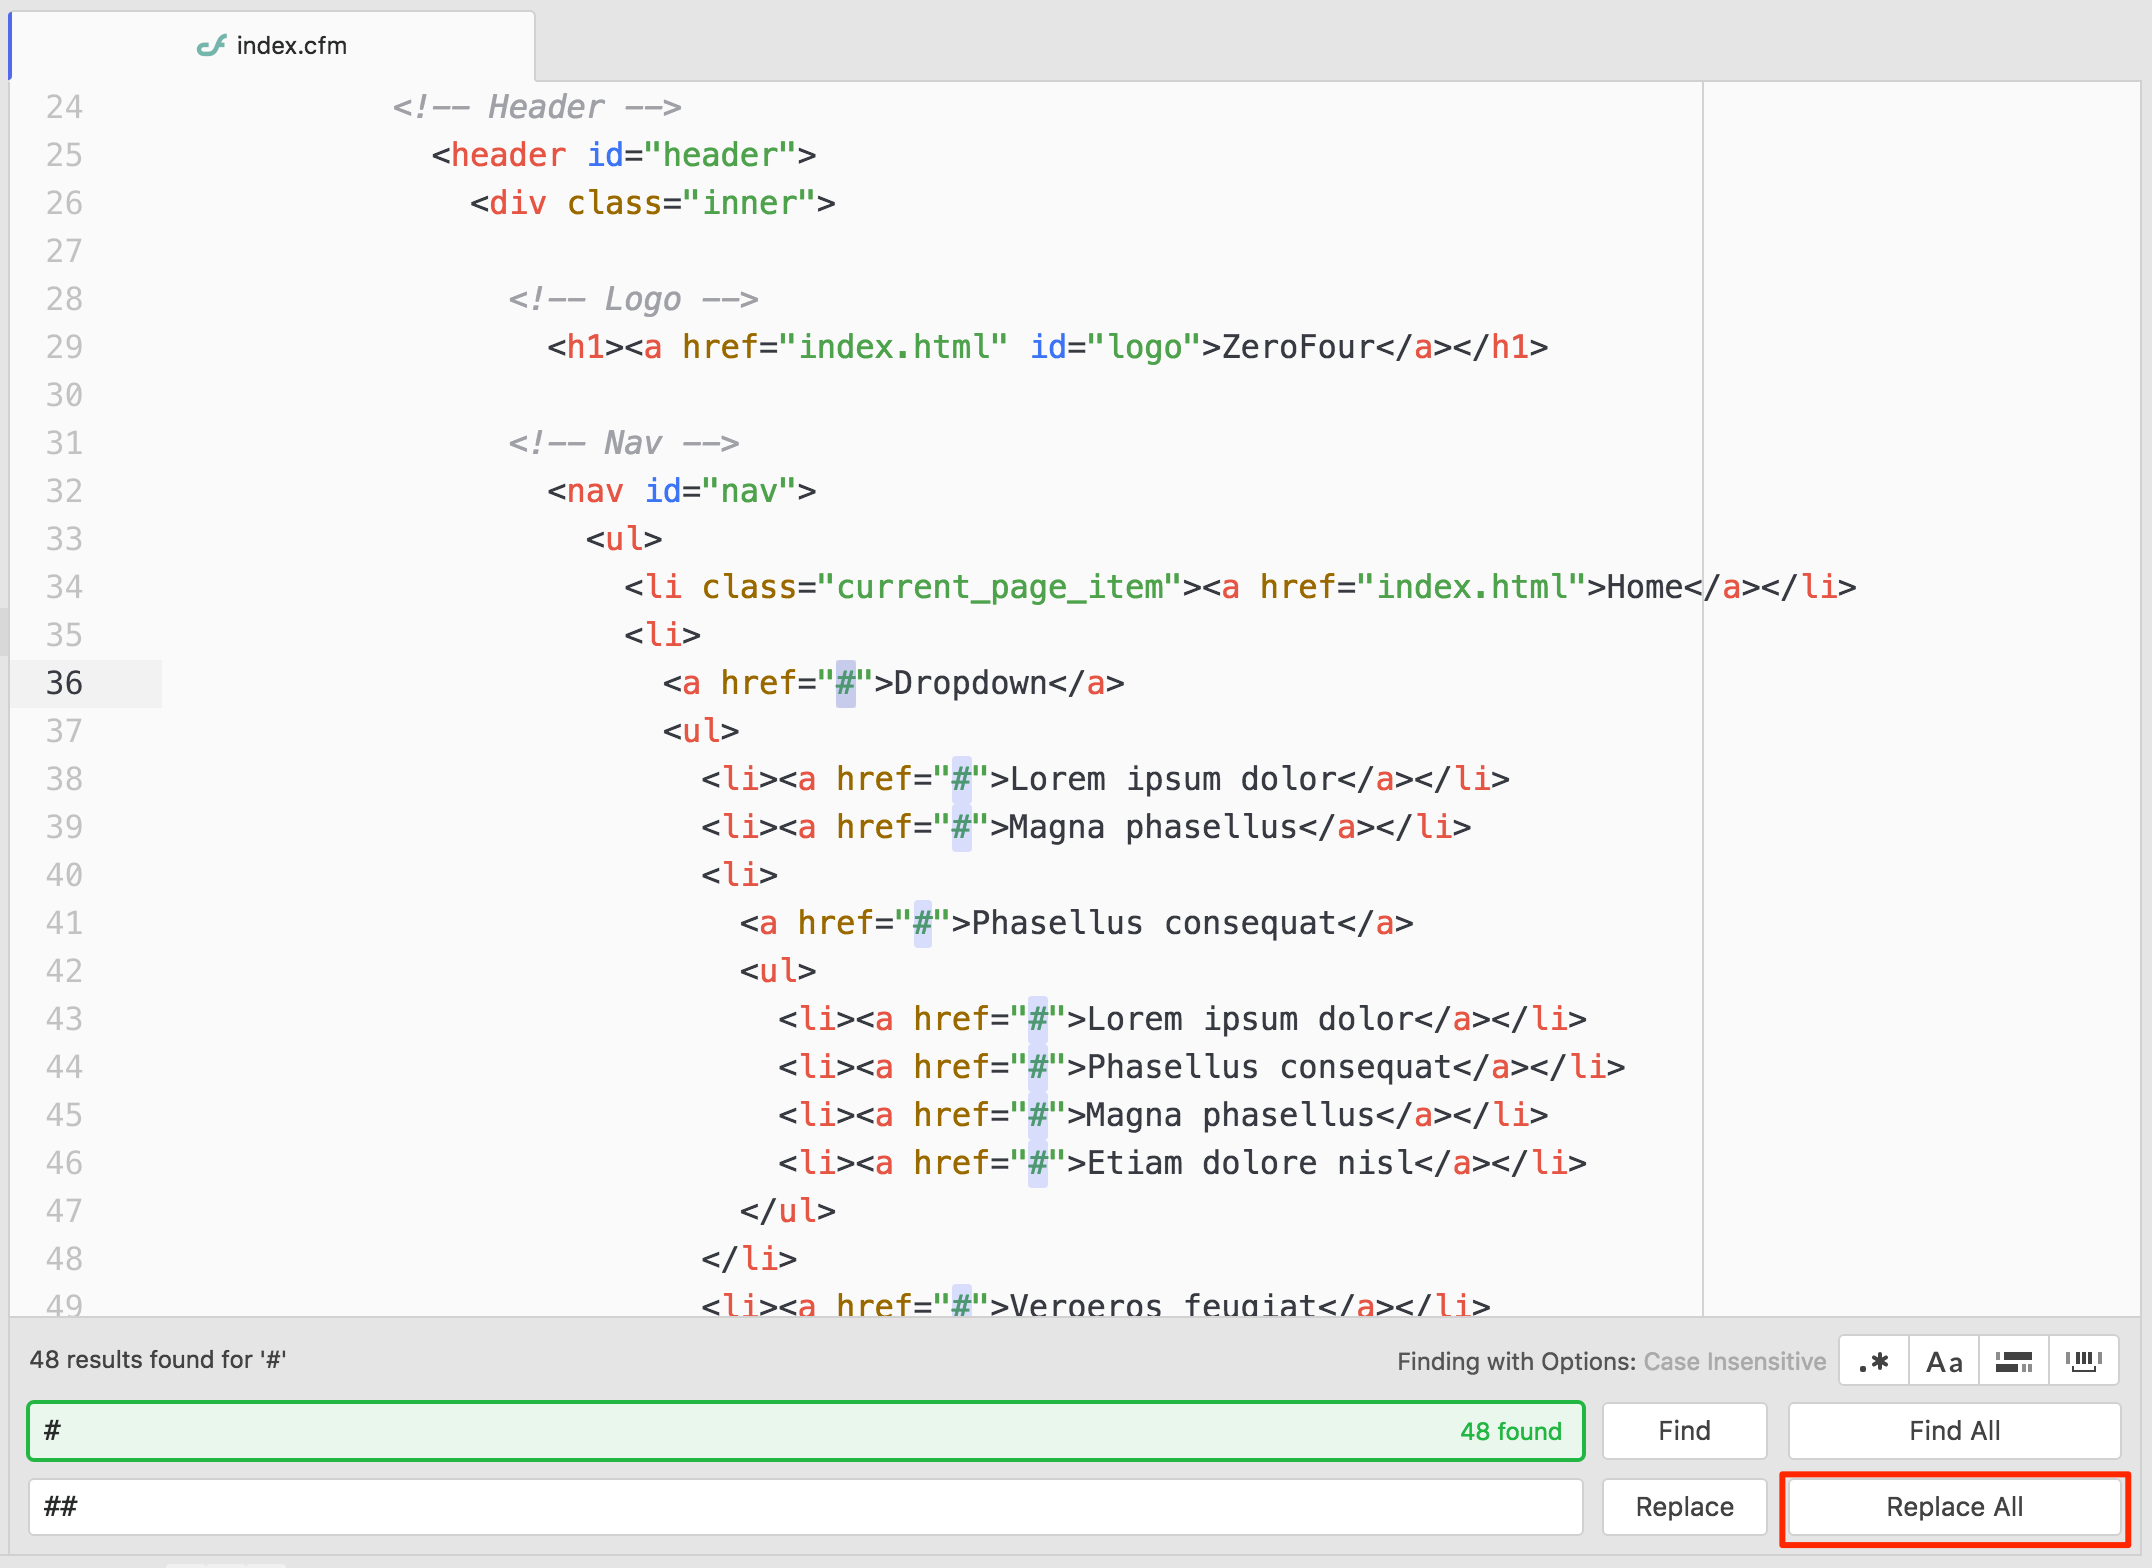
6. Replace # With ##
Hashtag/number sign (#) characters have special meaning in CFML. So, if your layout template has any hashtag characters, you will need to escape single hashtags with double hashtags. In short, you need to use ## to represent a single # character. Using a simple "find and replace" feature of most code editors tends to work well.
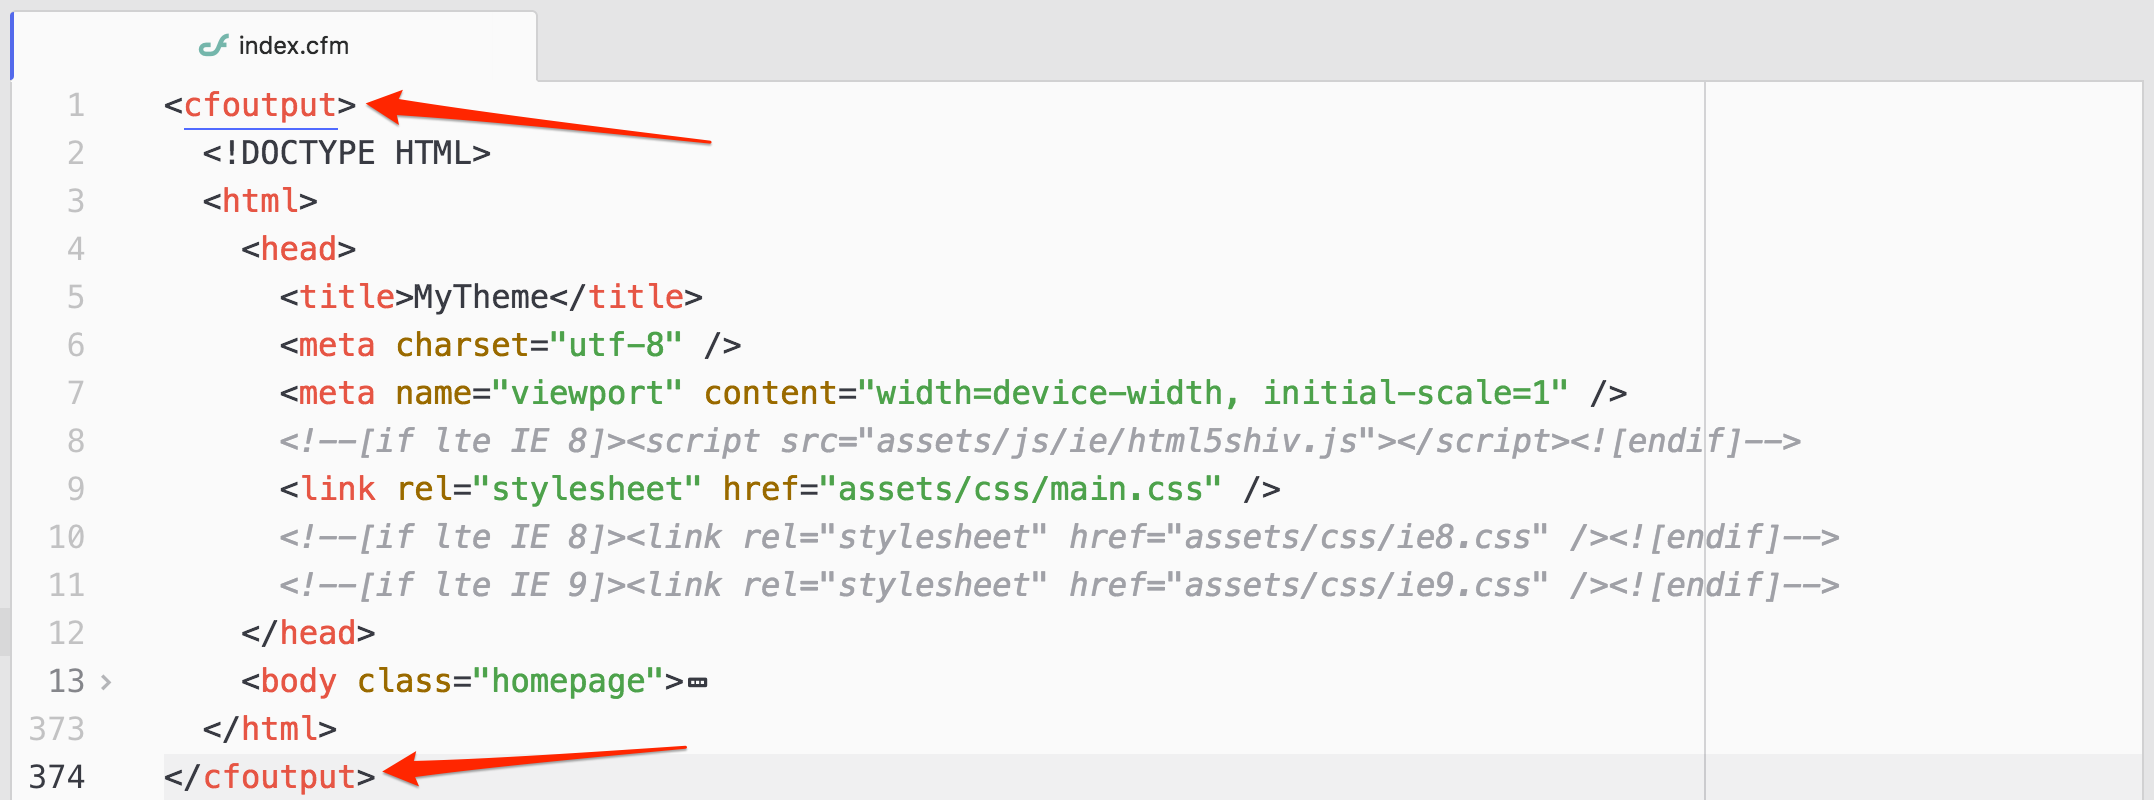
7. Wrap All Output With <cfoutput></cfoutput> Tags
In CFML, <cfoutput> tags displays output that can contain the results of processing CFML variables and functions. You're going to need these tags in your layout templates, because soon, you're going to be adding some template variables and code snippets, to replace your static text.
To learn more about <cfoutput> tags, visit https://helpx.adobe.com/coldfusion/cfml-reference/coldfusion-tags/tags-m-o/cfoutput.html.
Summary
Here's a quick overview of the process we've covered for creating theme layout templates so far:
- Move your theme to the "
themes" directory
- Create a "
templates" directory (and move your layout templates inside of it)
- Rename "
.html" files to ".cfm"
- Create a "
default.cfm" layout template
- Use commonly used layout template names
- Replace
# with ##
- Wrap all output with
<cfoutput></cfoutput> tags
Soon, we'll go through and replace static text with dynamic template variables and code snippets.
Example Theme Directory Structure
As previously mentioned, when you first install Mura, if a theme does not exist, Mura will attempt to download one for you based on the "defaultthemeurl" setting found in the {context}/config/settings.ini.cfm file. As of version 7.1, this setting defaults to "https://github.com/blueriver/MuraBootstrap4".
Using the MuraBootstrap4 theme as an example, the table below details the directories and files Mura automatically scans for, and those are identified with an asterisk (*) within the "Required" column. As you'll see below, the "templates" directory is the only one that's truly required.
| Directory or File |
Required |
Description |
| ../{ThemeName}/assets/ |
No |
Typically, various front-end framework and library files, are stored here. For example, "bootstrap" and "font-awesome" directories can be found in the MuraBootstrap4 theme. |
| ../{ThemeName}/content_types/ |
No* |
This directory, and its purpose is beyond the scope of this guide. Please visit the Mura Developer Guide for details. |
| ../{ThemeName}/css/ |
No* |
If an "editor.css" file is located, its styles will be included with CKEditor's styles for any HTML Editor type regions when editing content via Mura's user interface. |
| ../{ThemeName}/modules/ |
No* |
This directory, and its purpose is beyond the scope of this guide. Please visit the Mura Developer Guide for details. |
| ../{ThemeName}/images/ |
No |
Theme-specific images are typically stored here. |
| ../{ThemeName}/js/ |
No* |
This directory is used for storing theme-specific JavaScript files. In addition, Mura checks for an "editor" directory. If found, Mura then scans for some additional directories and files for customizing the web editor. Additional information can be found under the Customizing the Web Editor section. |
| ../{ThemeName}/resource_bundles/ |
No* |
As discuss in The "resource_bundles" Directory section, Mura offers a way to internationalize both the user interface, as well as parts of your theme. More information resource bundles, including how to customize and create your own key-value pairs, is covered in the Mura Developer Guide. |
| ../{ThemeName}/templates/ |
Yes |
This is technically, the only "required" directory. This is where you create and manage your theme-specific layout templates. See Theme Layout Templates for more information. |
| ../{ThemeName}/.gitignore |
No |
The Mura Team uses Git for distributed version control, and this is the site .gitignore file used to specify intentionally untracked files. |
| ../{ThemeName}/config.xml.cfm |
No* |
This file contains some theme-specific configuration settings. Visit The Mura Developer Guide to learn more. |
| ../{ThemeName}/contentRenderer.cfc |
No* |
This is the theme-specific contentRenderer.cfc. You can add any theme-specific methods here. Visit The Mura Developer Guide to learn more. |
| ../{ThemeName}/eventHandler.cfc |
No* |
This is the theme-specific eventHandler.cfc. You can add any theme-specific event handlers/listeners here. Visit The Mura Developer Guide to learn more. |
| ../{ThemeName}/README.md |
No |
General information about the theme itself is stored in this file. It is not used by Mura. |
Note: The primary focus of this guide is to help theme developers integrate their existing designs into Mura. The Mura Developer Guide will cover many of the more complex scenarios when it comes to building dynamic display areas, as well as extending the functionality of Mura.
Mobile Layouts
As a Mura theme developer, you'll want the ability to assist your content writers and content managers in engaging visitors using mobile devices. You'll learn Mura doesn't get in the way of whether or not you should use "responsive" design, or create a mobile-specific version of your entire site. Mura will simply deliver your desired content to whichever path you choose to pursue.
Throughout this section, you'll discover the various methods you can utilize to leverage both your design and development knowledge as well as Mura's baked-in features. From creating a mobile-specific layout template to displaying mobile-specific content, Mura can assist you in both the usability needs of mobile users, as well as delivering content mobile readers will love.
Note: You may also want to review the Mobile Navigation section of the Content Manager's Guide.
Using Responsive Layouts
The use of responsive web designs has grown exponentially, along with the explosion of people using their mobile devices to surf the web. Responsive design is a development approach where the page layout dynamically adjusts to the size of a user's screen, and often includes checking which type of device or browser is being used to access the site. Hence, content displayed on a "desktop" browser in a three-column layout, may re-flow to a two-column format for tablet devices, and a one-column layout for smaller, mobile devices.
Most modern front-end frameworks such as Bootstrap, Foundation, Semantic UI, and others, accommodate responsive layouts. For example, Mura's readily available MuraBootstrap4 theme utilizes the responsive web design features of Bootstrap.
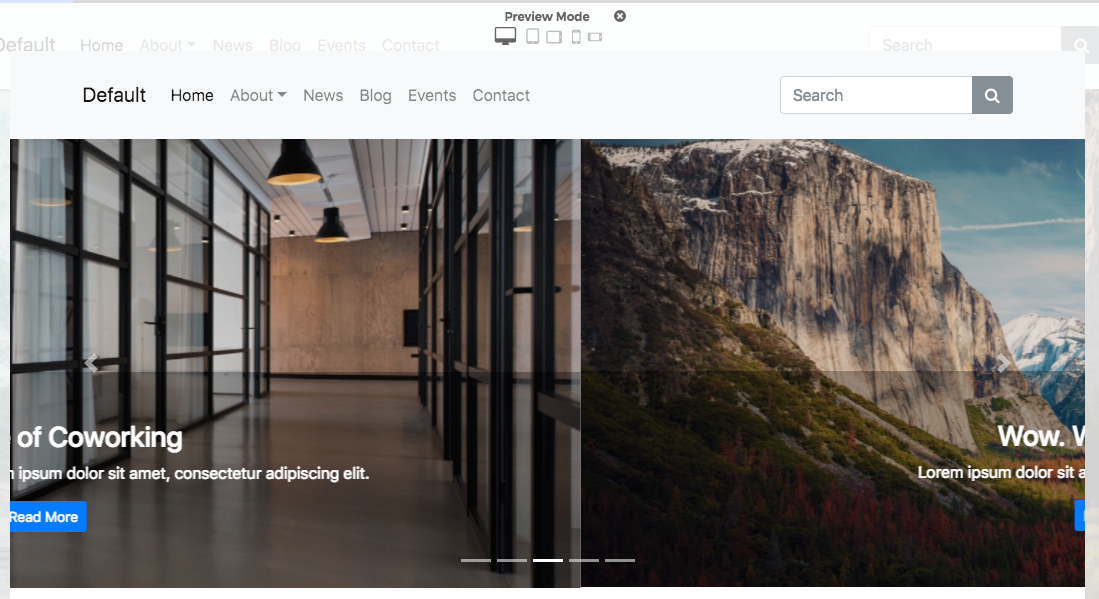
As you'll see in the "What Can I Use?" section, you can use pretty much any front-end framework you want. Mura also includes a useful tool when previewing the front-end of your site. The front-end toolbar includes a "Multi-Device Preview" button.

Clicking the Multi-Device Preview button will launch the Preview Mode window.
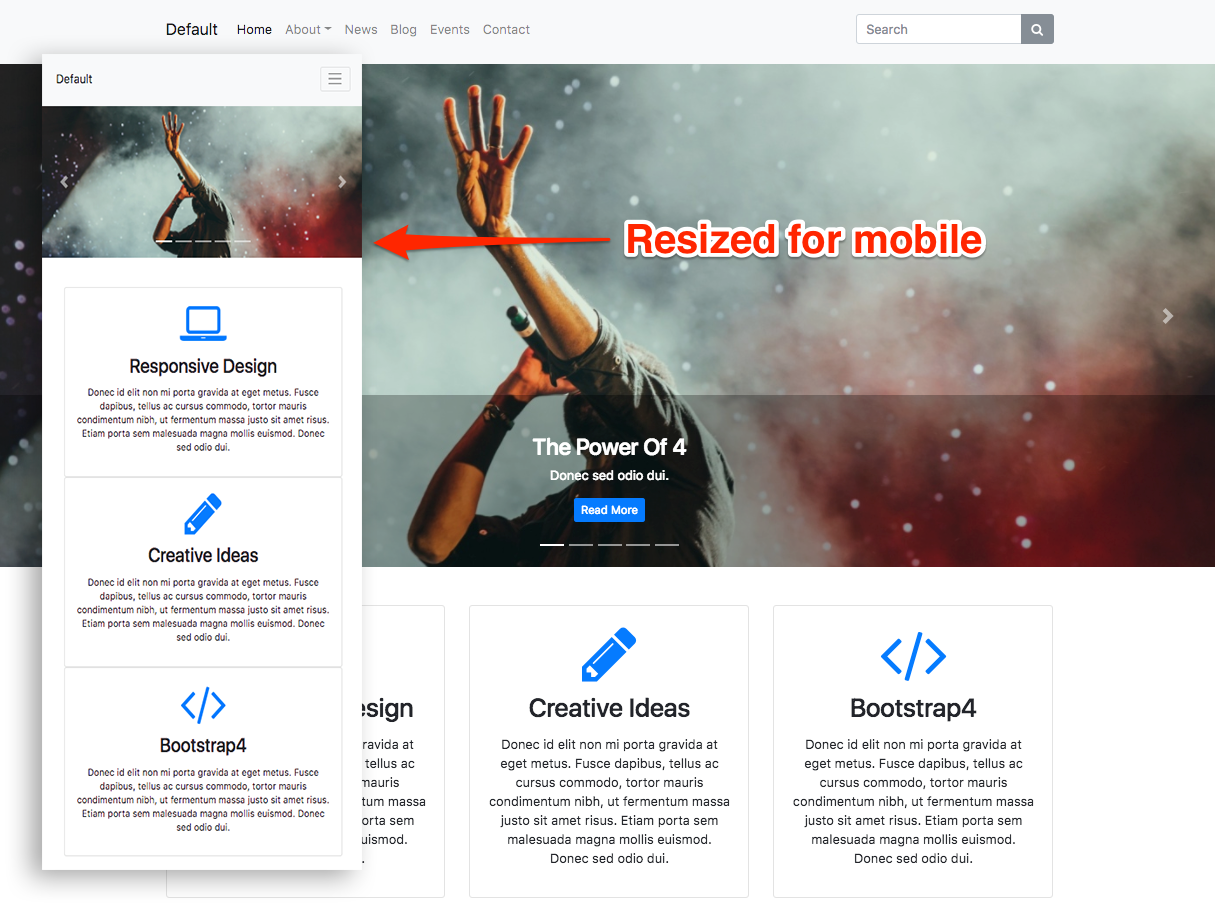
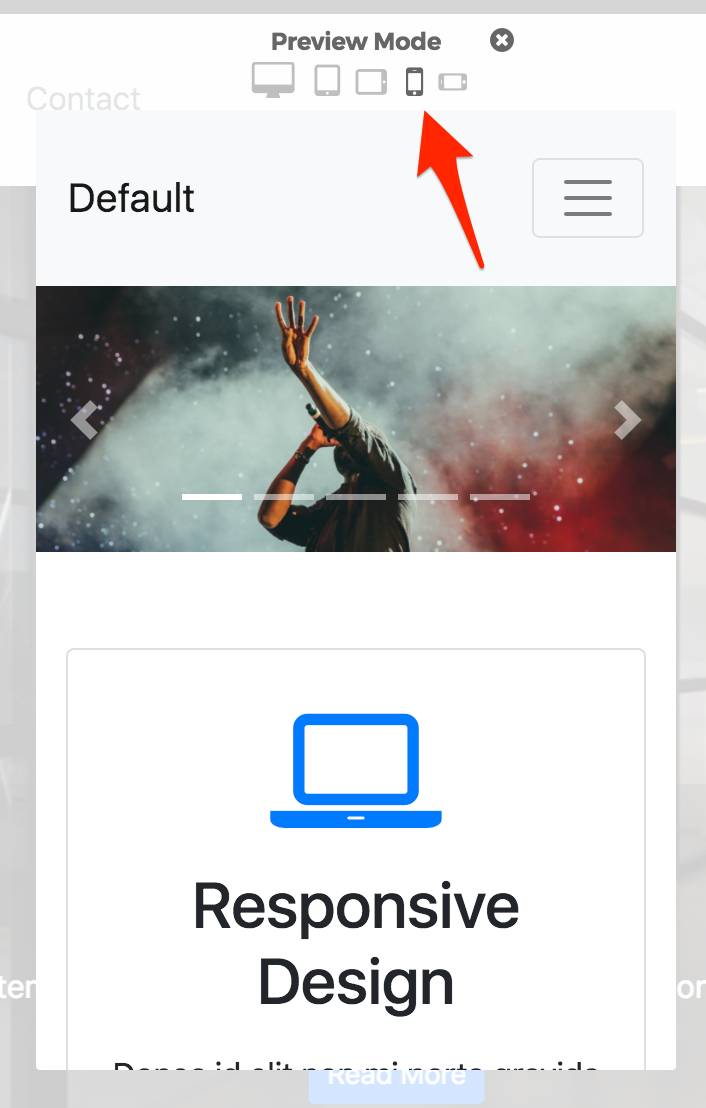
At the top of the window, you should be able to see five different button icons, each representing a different "view". Selecting a different icon, the screen will resize to give you an idea of how your content might display on a device with similar viewport dimensions. Options cover Desktop, Tablet Portrait, Tablet Landscape, Phone Portrait, and Phone Landscape.

For example, selecting Phone Portrait, the home page of the MuraBootstrap3 site might look like the following illustration.
Responsive layouts has become the most common approach to use in Mura to deliver content to both desktop and mobile users of your sites.
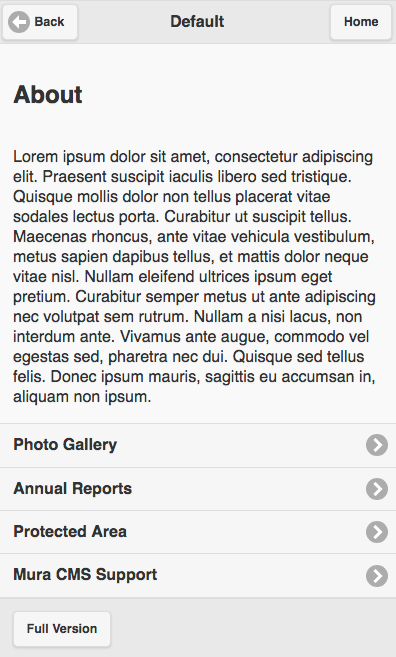
Using a Mobile-Specific Layout
As an alternative to using responsive layouts, you can use a mobile-specific layout template. Even though responsive front-end frameworks are the most popular today, there are still a number of popular mobile-specific frameworks in use such as jQuery Mobile, Framework 7, and Ratchet. You are free to use any framework you wish with Mura.
mobileFormat Cookie
Mura automatically detects the type of device being used to access a site by checking the User-Agent string. If Mura discovers a user is accessing the site from a mobile device, it sets a cookie labeled "mobileFormat" to true, otherwise it's set to false. In addition, when mobileFormat=true, Mura will automatically scan your theme's templates directory for a file labeled mobile.cfm to use as the layout template.
The mobileFormat cookie/setting can also be set via the URL. For example, if you append ?mobileFormat=true to your URL, you are effectively setting the cookie's value to true. Conversely, appending ?mobileFormat=false to the URL sets the cookie's value to false. This is useful for when you may wish to include a link for users to toggle between your "mobile" version and "desktop" or "full" version of your site.
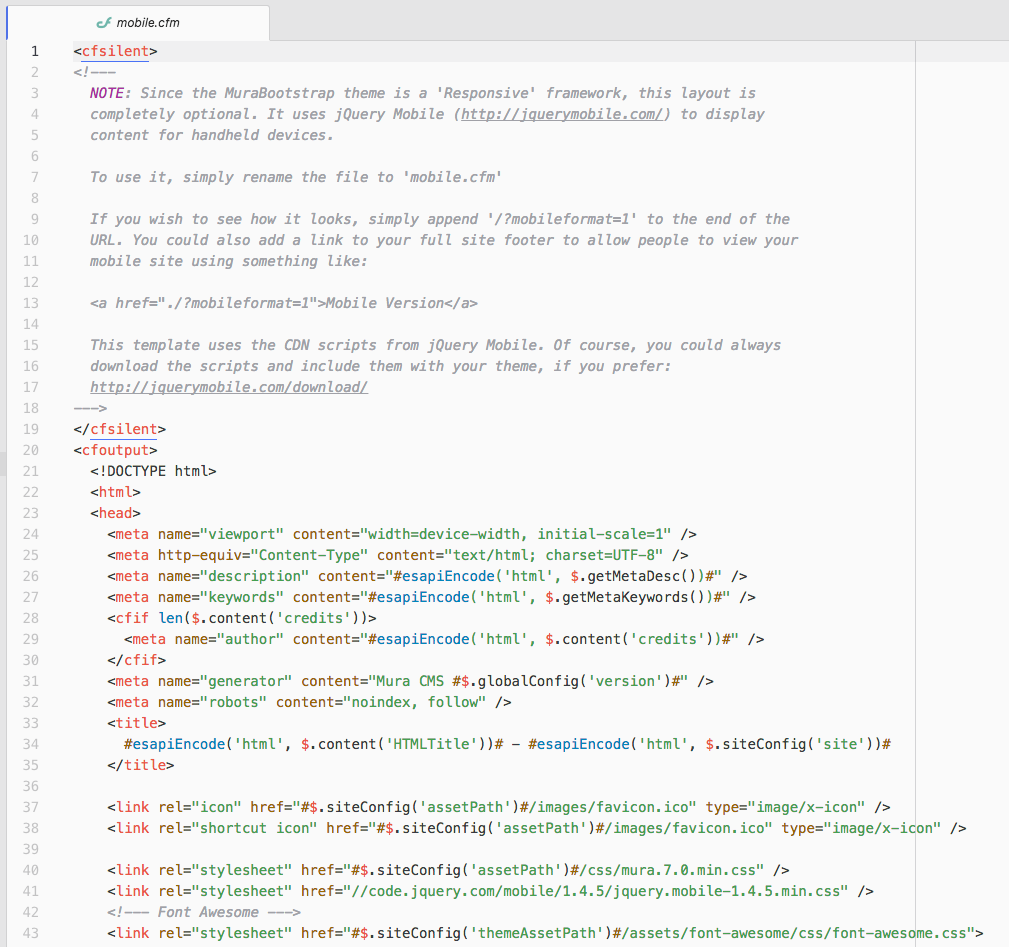
mobile.cfm Layout Template
As previously mentioned, if a user is accessing your site from a mobile device, Mura will look for a special layout template located under ../themes/{ThemeName}/templates/mobile.cfm. If this file is found, it will be used as the layout template for as long as mobileFormat=true.
An example mobile layout template can be found at https://bit.ly/mura-mobile-layout. If you copy the contents of the Gist, and paste them into your mobile.cfm layout template, and add ?mobileFormat=true to your URL, you should see that Mura is now using the mobile-specific layout template.
If we examine the code inside the mobile.cfm layout template file, you'll see that it's merely using the jQuery Mobile framework. However, as mentioned earlier, you may use any framework, or markup you wish.
You can apply the lessons learned from the Theme Layout Templates section to using the mobile.cfm layout template as well. Then, you'll spend most of your time swapping your static markup with Mura's template variables and helper methods.
Template Variables & Helper Methods
As a Mura theme developer, your layout templates are initially filled with static text. However, the primary reason for using a content management system (CMS) such as Mura, is so non-technical end users can create new content, and maintain existing content, quickly and easily.
Using the Mura Scope, theme developers are given the power to replace static text, with code that can dynamically display text and data entered into Mura by content managers. In addition to displaying text and data, the Mura Scope provides a number of useful helper methods to assist theme developers by dynamically generating navigational elements, display objects, as well as a special method to dynamically output the main content/body region, but only if the user accessing the content is allowed to do so.
Throughout this section, you'll find references to some of the most commonly used helper methods and template variables to help you get your theme integrated into Mura as quickly and efficiently as possible.
While reviewing the template variables and helper methods, you may find <cfdump>, a CFML tag, quite useful for inspecting them further than the documentation provides. For more information on <cfdump>, visit https://helpx.adobe.com/coldfusion/cfml-reference/coldfusion-tags/tags-d-e/cfdump.html
This section primarily covers template variables and helper methods frequently used by theme developers. Many of the helper methods covered in this section are found in Mura's contentRenderer. If you wish to learn more, visit the Mura Developer Guide, and/or the Mura Component API.
Note: Unlike JavaScript, and many other programming languages, CFML is case-insensitive. In other words, CFML does not distinguish between uppercase and lowercase variables, functions, or arguments/parameters. So, you don't have to strictly follow the casing found within the documentation when using CFML.
esapiEncode
Scattered throughout this section, and throughout the default theme that ships with Mura, you'll find references to a special method called esapiEncode. This method is used to encode a given string for safe output to stop Cross Site Scripting attacks. You can safely use this method in Mura, even though it has not been fully implemented in all available CFML engines yet.
Function Syntax
esapiEncode( encodeFor, string )
Parameters
| Parameter |
Type |
Req/Opt |
Default |
Description |
| encodeFor |
string |
Required |
|
encode for what, valid values are:
- css: for output inside Cascading Style Sheets (CSS)
- dn: for output in LDAP Distinguished Names
- html: for output inside HTML
- html_attr: for output inside HTML Attributes
- javascript: for output inside Javascript
- ldap: for output in LDAP queries
- url: for output in URL
- vbscript: for output inside vbscript
- xml: for output inside XML
- xml_attr: for output inside XML Attributes
- xpath: for output in XPath
|
| string |
string |
Required |
|
string to encode
|
Usage
We highly recommend to use this function whenever outputting user-entered text. For example, content managers enter text into Mura fields such as the Title, Credits, Meta Description, Meta Keywords, etc. Wherever you output these fields in your layout templates, be sure to pass the field in as the string to encode.
Example
The following example encodes a content item's "Title" for output inside of standard HTML heading tags.
<cfoutput>
	<h2>#esapiEncode('html', m.content('title'))#</h2>
</cfoutput>
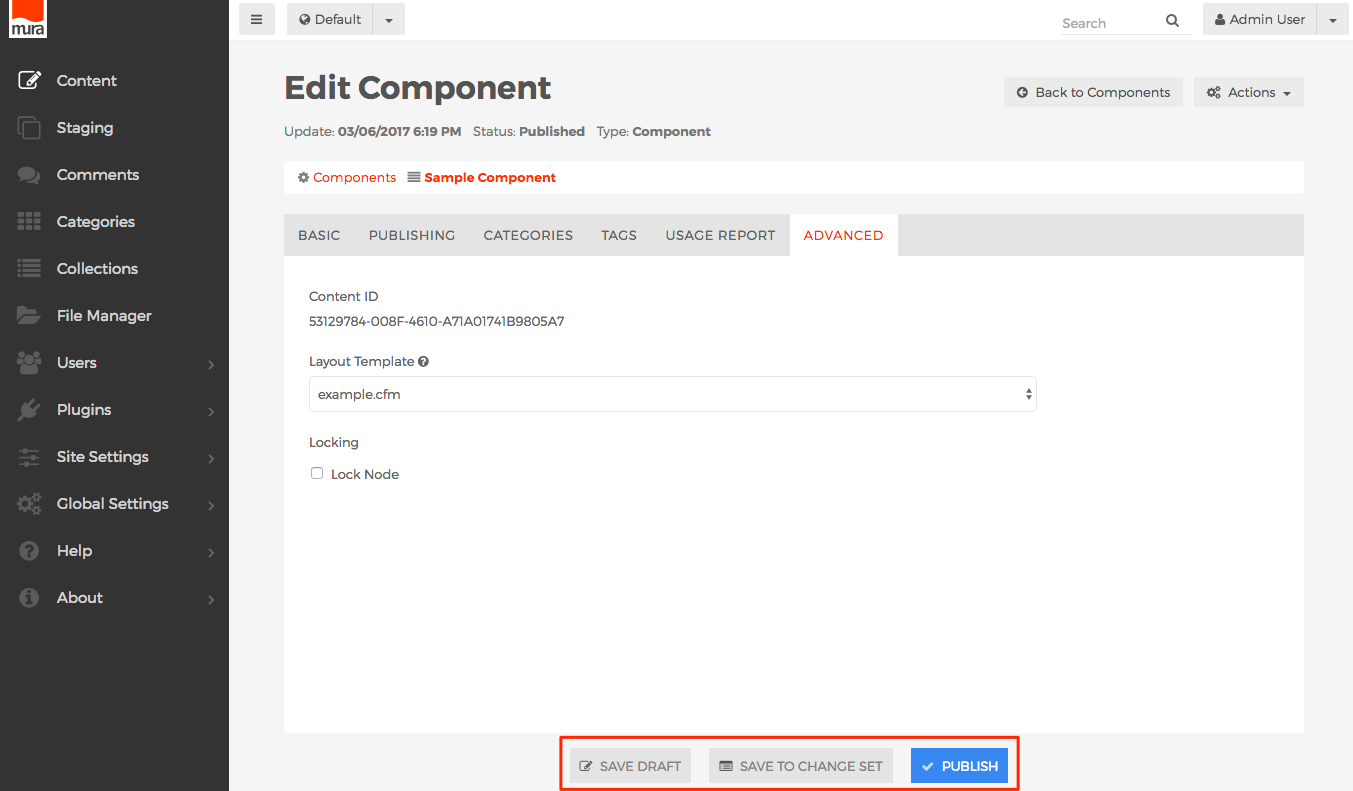
setDynamicContent
A Mura Scope helper method to render Mura [m] tags. This function checks a string for Mura [m] tags, and if found, will pass the variable or function call the the CFML server for processing before final rendering of the page.
Function Syntax
m.setDynamicContent( string )
Parameters
| Parameter |
Type |
Req/Opt |
Default |
Description |
| string |
string |
Opt |
empty string |
This is the string to parse for Mura [m] tags.
|
Usage
Use this function to search through a string for Mura [m] tags. Most use cases revolve around user-entered text that may, or may not, contain Mura [m] tags, such as the "Summary" field of a content item.
Examples
You can wrap this method around any string, or anticipated string, to render Mura [m] tags.
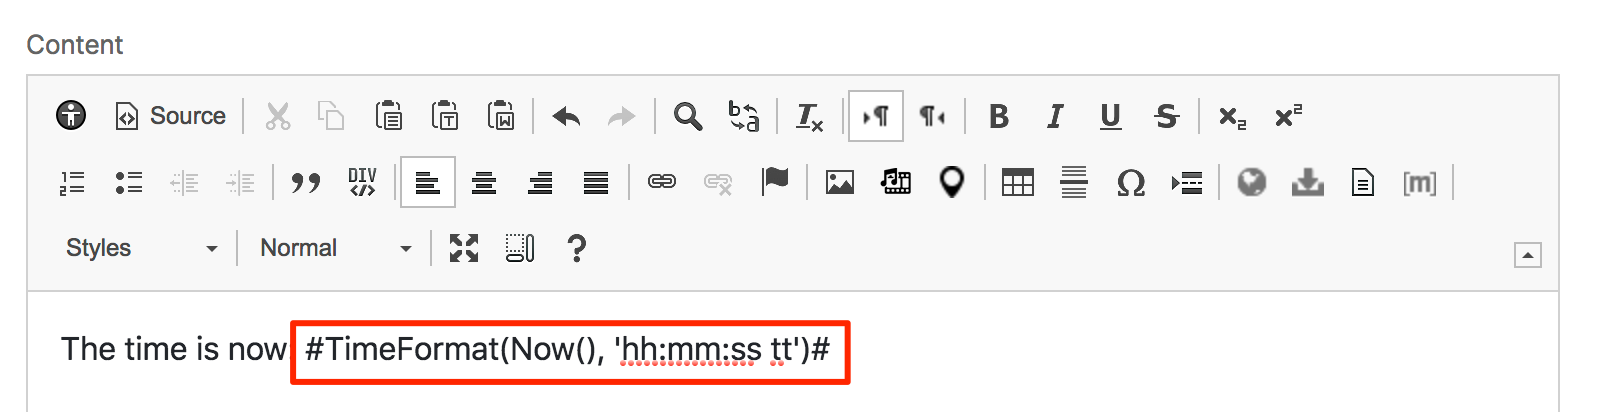
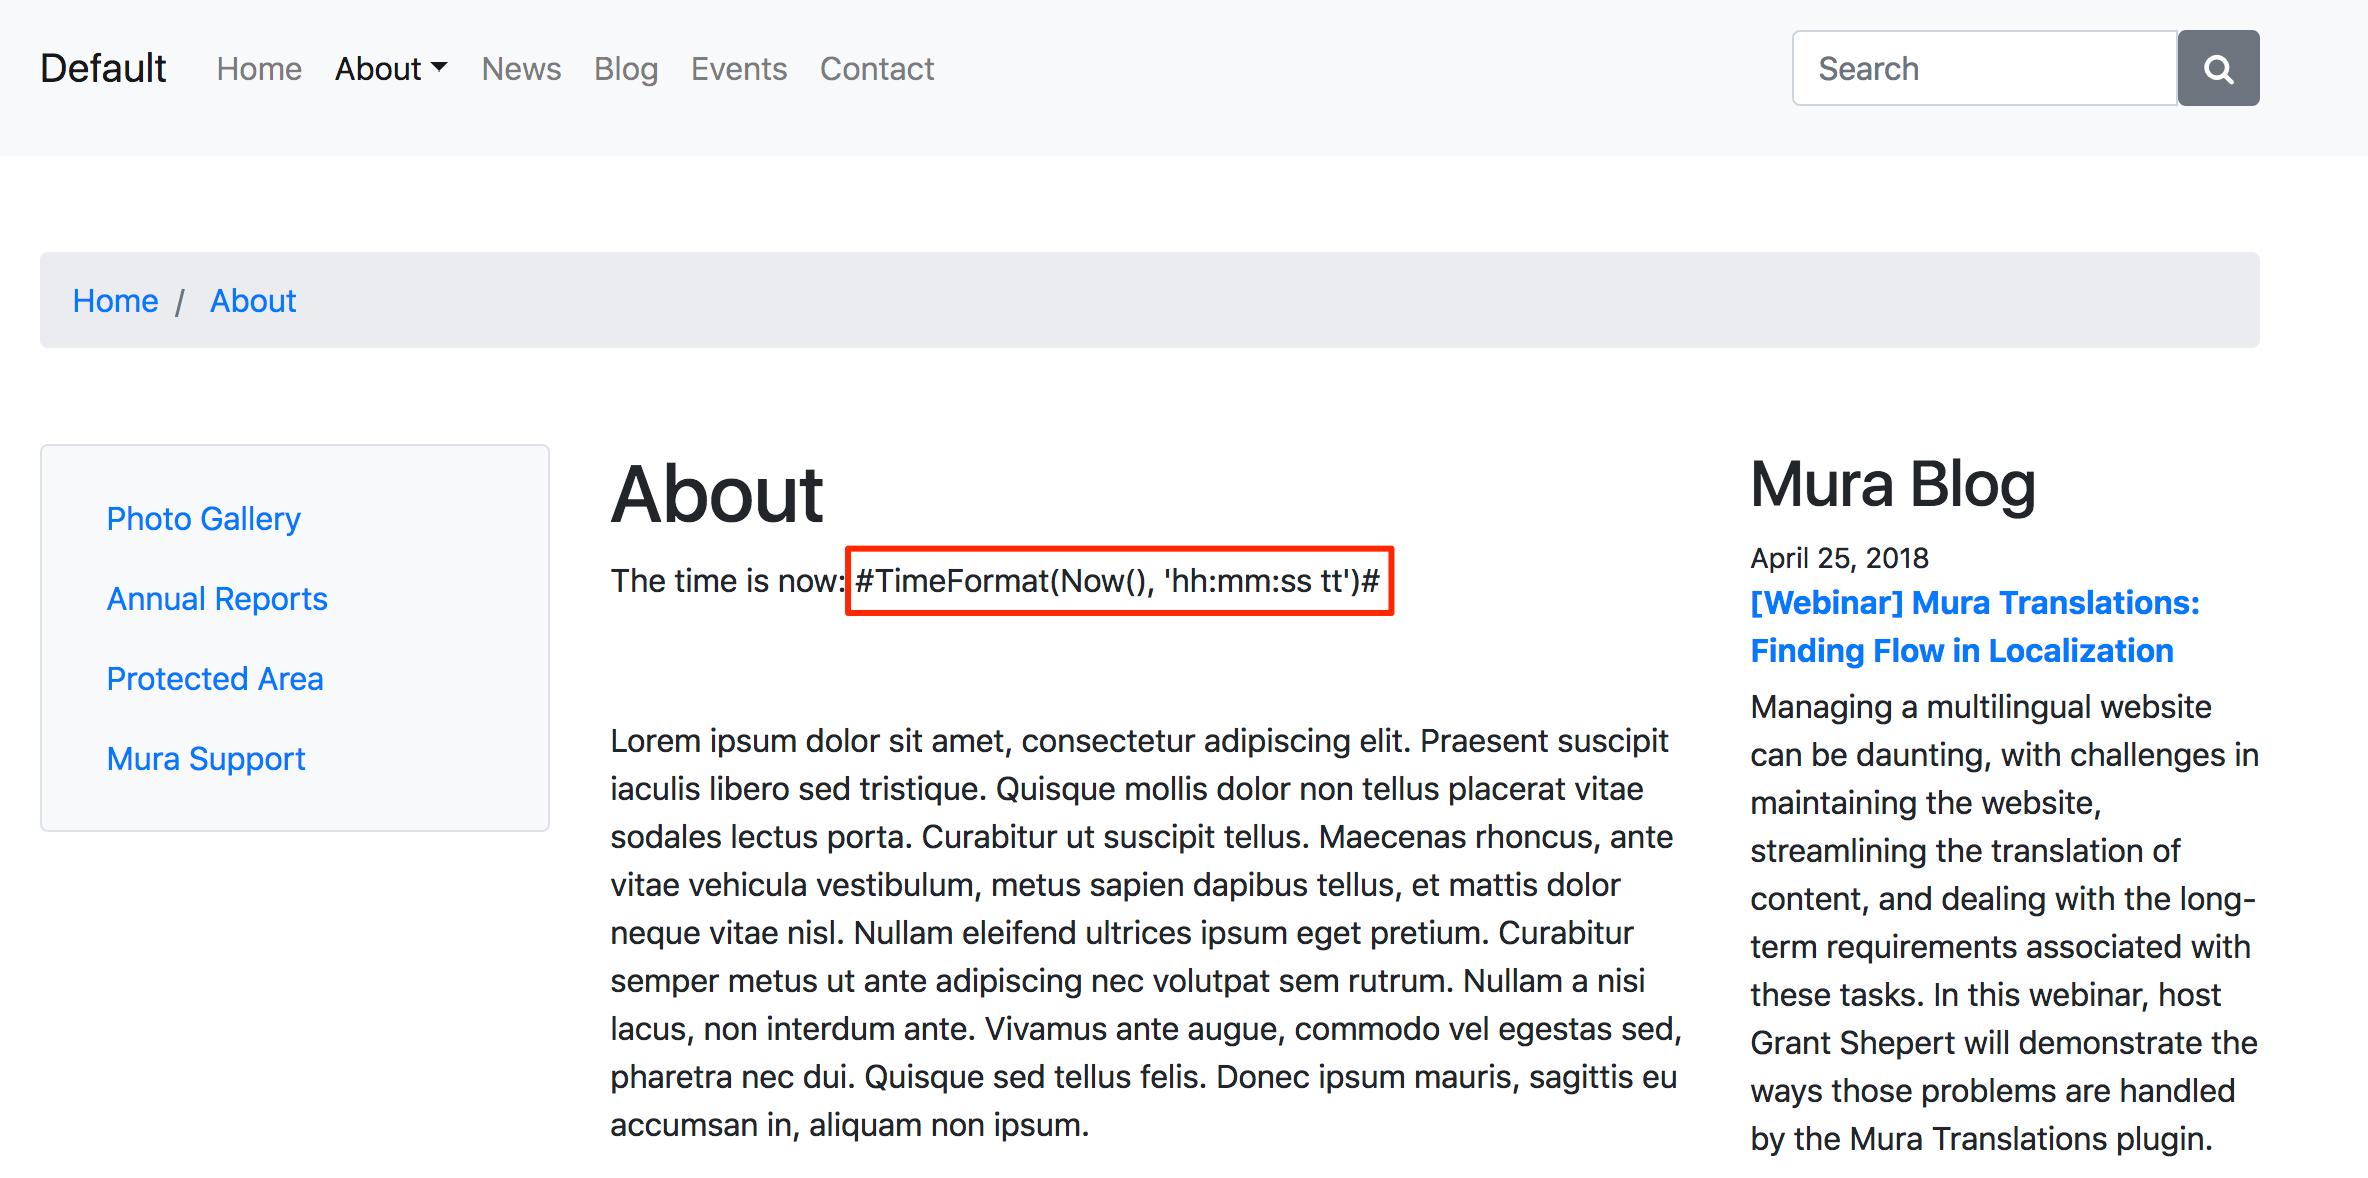
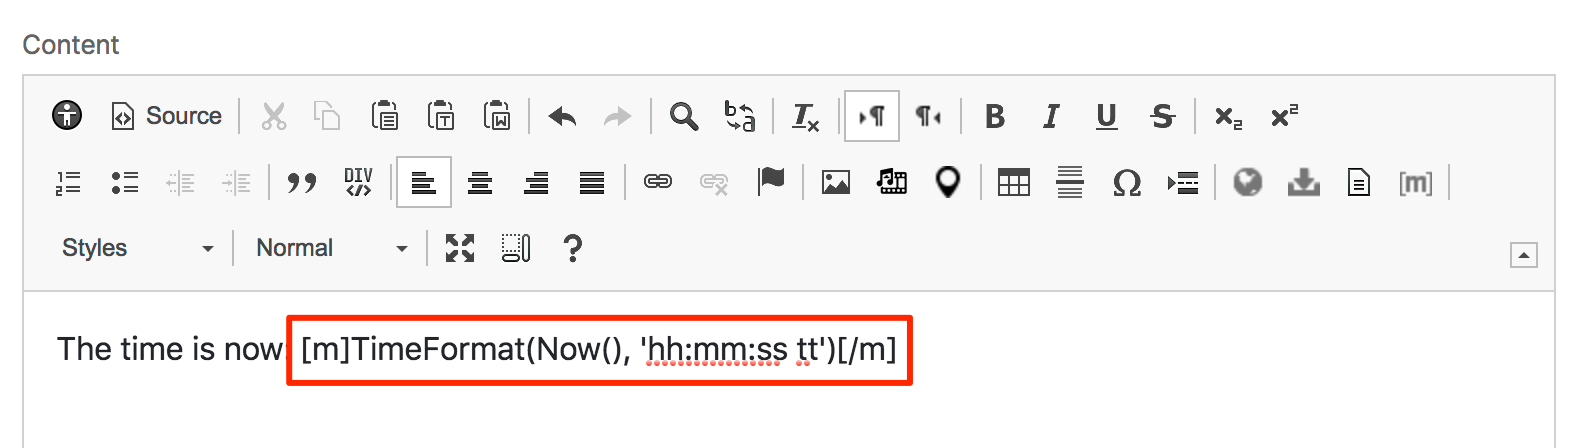
Basic Example
The following is a very basic example to illustrate how to output an explicit string containing Mura [m] tags.
<cfset exampleString = "Today is [m]DateFormat(Now(), 'yyyy-mm-dd')[/m]" />
<cfoutput>
    <div>
        #m.setDynamicContent(exampleString)#
    </div>
</cfoutput>
Content Summary
The following example illustrates how to output a content item's "Summary" field, if you expect it may contain Mura [m] tags. You could apply this method to nearly any text field of a content item.
<cfoutput>
    <article>
        #m.setDynamicContent(m.content('summary'))#
    </article>
</cfoutput>
dspPrimaryNav
A Mura Scope helper method to dynamically output primary navigation. Mura also checks a user's permissions, and will only display links to content the user has access to. If a section of a site is restricted, a link will be generated to the topmost content item only. If a user visits that link, they will be presented with a login screen, if they're not currently logged in, or if they are logged in and don't have access, a message will inform the user they do not have the proper authorization.
Function Syntax
m.dspPrimaryNav(
    viewDepth
    , id
    , class
    , displayHome
    , closeFolders
    , openFolders
    , showCurrentChildrenOnly
    , liClass
    , liHasKidsClass
    , liHasKidsAttributes
    , liCurrentClass
    , liCurrentAttributes
    , liHasKidsNestedClass
    , aHasKidsClass
    , aHasKidsAttributes
    , aCurrentClass
    , aCurrentAttributes
    , ulNestedClass
    , ulNestedAttributes
    , aNotCurrentClass
    , siteid
    , complete
)
Parameters
| Parameter |
Type |
Req/Opt |
Default |
Description |
| viewDepth |
Numeric |
Opt |
1 |
Expects a numeric value to indicate how 'deep' each top level nav should go when listing its children. It is not recommended to set this greater than 1 or 2 due to the overhead required to parse a node's 'current' location and permissions. Setting it to a '0' results in no dropdowns or more specifically, no output of links to child nodes.
|
| id |
String |
Opt |
navPrimary |
This is the id attribute of the opening <ul> element used to output primary navigation.
|
| class |
String |
Opt |
|
This is the class attribute of the opening <ul> element used to output primary navigation.
|
| displayHome |
String |
Opt |
conditional |
This controls whether or not a 'Home' link appears in the primary navigation. Valid options are:
conditional - does not display a link to 'Home' when viewing the Home page itself, but will display at all other timesalways - a link to 'Home' will appear at all timesnever - a link to 'Home' will never appear
|
| closeFolders |
string |
Opt |
|
This controls the visibility of a Folder's child links. Valid options are:
truefalse- A comma-delimited list of ContentID's (found on the 'advanced' tab of any content item).
|
| openFolders |
string |
Opt |
|
This controls the visibility of a Folder's child links. Valid options are:
truefalse- A comma-delimited list of ContentID's (found on the 'advanced' tab of any content item).
|
| showCurrentChildrenOnly |
boolean |
Opt |
false |
This controls the visibility of a content item's child links. If true, then child links will only appear for the section currently being viewed on the front end of the site. This can be useful when creating a vertical oriented navigation. Valid options are:
|
| liClass |
string |
Opt |
|
Controls the class attribute of <li> elements.
|
| liHasKidsClass |
string |
Opt |
|
Controls the class attribute of <li> elements that have children.
|
| liHasKidsAttributes |
string |
Opt |
|
Optionally pass in any additional attributes to output with <li> elements that have children.
|
| liCurrentClass |
string |
Opt |
|
Control the class attribute of the current <li> element.
Also configurable via the Site or Theme contentRenderer.cfc's this.liCurrentClass setting.
|
| liCurrentAttributes |
string |
Opt |
|
Optionally pass in any additional attributes to output with the current <li> element.
|
| liHasKidsNestedClass |
string |
Opt |
|
Control the class attribute of any <li> element that has children. Useful for adding markup that will include icons such as arrows, etc.
Also configurable via the Site or Theme contentRenderer.cfc's this.liHasKidsNestedClass setting.
|
| aHasKidsClass |
string |
Opt |
|
Control the class attribute of <a> elements that have children.
|
| aHasKidsAttributes |
string |
Opt |
|
Optionally pass in any additional attributes to output with <a> elements that have children.
|
| aCurrentClass |
string |
Opt |
current |
Control the class attribute of the current <a> element.
Also configurable via the Site or Theme contentRenderer.cfc's this.aCurrentClass setting.
|
| aCurrentAttributes |
string |
Opt |
|
Optionally pass in any additional attributes to output with the current <a> element.
Also configurable via the Site or Theme contentRenderer.cfc's this.aCurrentAttributes setting.
|
| ulNestedClass |
string |
Opt |
|
Control the class attribute of <ul> elements that are nested within other <ul> elements.
|
| ulNestedAttributes |
string |
Opt |
|
Optionally pass in any additional attributes to output with <ul> elements that are nested within other <ul> elements.
|
| aNotCurrentClass |
string |
Opt |
|
Control the class attribute of all <a> elements that are not currently active or currently being viewed.
Also configurable via the Site or Theme contentRenderer.cfc's this.aNotCurrentClass setting.
|
| siteID |
string |
Opt |
$.event('siteid') |
You can optionally pass in a SiteID from another site managed under the same installation. It default's to the SiteID of the site currently being visited.
|
| complete |
boolean |
Opt |
false |
If true, links are output with the full URL, including the domain. Valid options are:
|
Usage
Use this function to output primary navigation.
Example
The following example outputs the primary nav up to two-levels deep.
<cfoutput>
    <nav>
       #m.dspPrimaryNav(
           viewDepth=2
           , id='navPrimary'
           , class='nav navbar-nav'
           , displayHome='always'
           , closeFolders=false
           , showCurrentChildrenOnly=false
           , ulNestedClass='dropdown-menu'
           , liHasKidsNestedClass='dropdown-submenu'
           , aHasKidsClass='dropdown-toggle'
           , aHasKidsAttributes='role="button" data-toggle="dropdown" data-target="##"'
        )#
   </nav>
</cfoutput>
dspBody
A Mura Scope helper method to dynamically output the body/content of a content item. This function automatically checks the content type, and displays output accordingly (e.g., if a Mura "Folder" or "Calendar", will output the children). Additionally, Mura checks to see if the content is restricted/protected, and if so, checks to see if the current user is logged in. If not logged in, will display a login screen. If user is logged in and does not have the required permissions, Mura will display a message to the user in lieu of the content.
Function Syntax
m.dspBody(
    body
    , pageTitle
    , crumbList
    , crumbSeparator
    , showMetaImage
    , metaImageSizeArgs
    , metaImageClass
    , includeMetaHREF
)
Parameters
| Parameter |
Type |
Req/Opt |
Default |
Description |
| body |
string |
Opt |
m.content('body') |
This is the primary content/body of a content item. If you omit this parameter, Mura will automatically use the content/body of the current content item.
|
| pageTitle |
string |
Opt |
empty string |
If you wish to display a title above the body/content, you may optionally pass in a title. For example: m.content('title')
|
| crumbList |
boolean |
Opt |
true |
If true, will display breadcrumb links above the body/content. Valid options are:
|
| crumbSeparater |
string |
Opt |
» |
If crumbList=true, the string passed in here will be used as a delimiter between the links.
|
| showMetaImage |
boolean |
Opt |
true |
If true, will display the content item's associated image. Valid options are:
|
| metaImageSizeArgs |
struct |
Opt |
{size='medium'} |
An object/struct (list of key-value pairs) to be passed to the m.content().getImageURL(args) function. Commonly used keys are:
size (string, req). Valid values are:
smallmediumlargecustom- Or, any pre-defined image size
height (opt). If size='custom', pass in desired height in pixels.width (opt). If size='custom', pass in desired width in pixels.
|
| metaImageClass |
string |
Opt |
empty string |
This is the class attribute of the <img> tag for the associated image.
|
| includeMetaHREF |
boolean |
Opt |
true |
If true, will wrap the content item's associated image with <a> tags and a link to the content item. Valid options are:
|
Usage
Use this function to output the main content/body of a content item.
Example
The following example outputs the content/body, without a page title or breadcrumbs, while outputting the associated image (if one exists) using the 'medium' image size.
<cfoutput>
    <article>
        #m.dspBody(
            body=m.content('body')
            , pageTitle=''
            , crumbList=false
            , showMetaImage=true
            , metaImageSizeArgs={size='medium'}
        )#
   </article>
</cfoutput>
dspObjects
A Mura Scope helper method to dynamically output the display objects assigned to display regions.
Function Syntax
m.dspObjects( columnID )
Parameters
| Parameter |
Type |
Req/Opt |
Default |
Description |
| columnID |
numeric |
Req |
|
Enter the desired display region number as defined under Site Settings > Edit Settings, Display Regions tab. The region number is determined by "^" delimited list position of Display Region Names, starting with "1" (not zero). For example, if the Display Region Names were "Left Column^Main Content^Right Column" and you wanted to output display objects assigned to the "Main Content" region, you would pass the number "2" for the columnID parameter.
|
Usage
Use this function to output display objects assigned to specific display regions.
Examples
The following example outputs display objects assigned to the second display region as defined under Site Settings > Edit Settings, Display Regions tab, Display Region Names list position.
<cfoutput>
    <article class="display-objects-wrapper">
        #m.dspObjects(2)#
    </article>
</cfoutput>
Default Settings Example
The following is merely a simple reference to output the display regions as initially set up in Mura. However, you will want to verify your settings defined under Site Settings > Edit Settings, Display Regions tab, and adjust accordingly.
<cfoutput>
    <!--- Left Sidebar/Column Display Objects --->
    <aside class="left-sidebar display-objects-wrapper">
        #m.dspObjects(1)#
    </aside>

    <!--- Main Content Display Objects --->
    <article class="main-content display-objects-wrapper">
        #m.dspObjects(2)#
    </article>

     <!--- Right Sidebar/Column Display Objects --->
    <aside class="right-sidebar display-objects-wrapper">
        #m.dspObjects(3)#
    </aside>
</cfoutput>
dspObject
A Mura Scope helper method to dynamically output specific types Mura display objects such as components, forms, and more.
Function Syntax
m.dspObject(
    object
    , objectid
    , siteid
)
Parameters
| Parameter |
Type |
Req/Opt |
Default |
Description |
| object |
string |
Req |
|
The type of object you wish to display. Valid options are:
- plugin
- feed
- feed_no_summary
- category_summary
- category_summary_rss
- tag_cloud
- site_map
- related_content
- component
- form
|
| objectID |
string |
Req* |
|
The Object ID or Title/Name of the object. *The following objects do not require an objectID:
- category_summary
- category_summary_rss
- tag_cloud
- site_map
- related_content
|
| siteID |
string |
Opt |
empty string |
Optionally pass a different SiteID, if you wish to display an object from another site under the same instance of Mura.
|
Usage
Use this function to output specific types of Mura display objects.
Examples
Listed below are some examples of how to render specific types of Mura display objects.
Component
The following example outputs a "Component" named "Footer".
<cfoutput>
    <footer>
        #m.dspObject(object='component', objectid='Footer')#
    </footer>
</cfoutput>
Form
The following example outputs a "Form" named "Contact Us".
<cfoutput>
    <aside class="contact-us-wrapper">
        #m.dspObject(object='form', objectid='Contact Us')#
    </aside>
</cfoutput>
Category Summary
The following example outputs a "Category Summary" display object. Keep in mind, this will only output something if the section of the site you're currently viewing actually has categorized content.
<cfoutput>
    #m.dspObject(object='category_summary')#
</cfoutput>
dspCrumbListLinks
A Mura Scope helper method to dynamically output breadcrumbs as a navigational aid to allow users to keep track of their location within the website. The breadcrumb links are output as a HTML ordered list (<ol>), and will already be assigned the classes of mura-breadcrumb and breadcrumb.
Function Syntax
m.dspCrumbListLinks(
    id
    , separator
    , class
)
Parameters
| Parameter |
Type |
Req/Opt |
Default |
Description |
| id |
string |
Opt |
crumblist |
A string to use as the id attribute of the ordered list (<ol>) for the breadcrumb links.
|
| separator |
string |
Opt |
empty string |
An entity-encoded string to use as a separator between each breadcrumb in the list.
|
| class |
string |
Opt |
empty string |
A string to use as the class attribute of the ordered list (<ol>) for the breadcrumb links, in addition to the pre-assigned classes of mura-breadcrumb and breadcrumb.
|
Usage
Use this function to output breadcrumb links.
Example
The following example outputs breadcrumb links.
<cfoutput>
<nav class="breadcrumbs-wrapper">
#m.dspCrumbListLinks(
id = 'your-id'
, separator = '» '
, class = 'your-class'
)#
</nav>
</cfoutput>
outputMuraCSS
A Mura Scope helper method to dynamically output links to Mura's stylesheets to account for basic styling of Mura-generated output. Just to clarify, including Mura's CSS is completely optional. However, using it can save you loads of time in the long run.
Function Syntax
m.outputMuraCSS(
    version
    , includeskin
    , complete
    , useprotocol
)
Parameters
| Parameter |
Type |
Req/Opt |
Default |
Description |
| version |
string |
Opt |
7.1 |
A string to allow for backward-compatibility. For example, if your theme was originally created for 7.0, you may pass "7.0" as the value. However, keep in mind that prior versions of Mura's CSS may not account for newer Mura-generated markup. |
| includeskin |
boolean |
Opt |
true |
If true, Mura will include a separate stylesheet to account for some very basic
|
| complete |
boolean |
Opt |
false |
If true, Mura will include the domain for the "href" attribute(s) of the auto-generated <link> elements. If false, Mura will omit the domain, and include the absolute path to Mura's CSS. |
| useprotocol |
boolean |
Opt |
true |
If true, and complete=true, Mura will include the "protocol" for the "href" attribute(s) of the auto-generated <link> elements. For example, <link rel="stylesheet" href="https://yourdomain/...">. |
Usage
Use this function to include Mura's own CSS for basic styling of Mura-generated output.
Example
The following example outputs Mura's CSS
<cfoutput>
  <!--- Always include this _before_ any custom CSS --->
  #m.outputMuraCSS(version='7.1', includeskin=true)#

  <!--- Custom CSS should go here --->
</cfoutput>
Illustrated below is an example of a theme without Mura-generated CSS.
Below is an illustration of the same example as above, using Mura-generated CSS.
The differences are even more noticeable when you are creating a custom theme from scratch.
createCssHook
A Mura Scope helper method to dynamically create CSS-friendly hooks for use within your layout templates. Pass in any string of text, and Mura will strip out CSS-unfriendly characters (e.g., script tags, HTML tags, etc.), and create a CSS-friendly string. Spaces, underscores, and bad characters (such as entity-encoded characters, etc.) are replaced with hyphens. Any capital letters are converted to lowercase. If the first character is numeric or begins with a hyphen, the character will be stripped from the resulting string.
Function Syntax
m.createCssHook( text )
Parameters
| Parameter |
Type |
Req/Opt |
Default |
Description |
| text |
string |
Req |
|
A string to use to create a CSS-friendly hook with.
|
Usage
Use this function to create CSS-friendly hooks.
Example
The following example outputs a class of "body-" and is appended with a CSS-friendly hook based on a content item's "Title".
<cfoutput>
    <body class="body-#m.createCssHook(m.content('title'))#">
        ...
    </body>
</cfoutput>
In the example above, if the "Title" was "About Us", the output would result in the the following.
<body class="body-about-us">
    ...
</body>
getURLForImage
A Mura Scope helper method to output the URL for an image based on a fileID. The result can then be used to populate the src attribute of a HTML image tag (<img>) to display the image via a browser.
Function Syntax
m.getURLForImage(
    fileID
    , size
    , complete
    , height
    , width
    , siteID
)
Parameters
| Parameter |
Type |
Req/Opt |
Default |
Description |
| fileID |
string |
Req |
|
The fileID as stored in Mura's database to use as the source image file.
|
| size |
string |
Opt |
large |
The image size to use. Valid options are:
|
| complete |
boolean |
Opt |
false |
If true, will output the entire path to the image, including the domain. If false, will output the absolute path to the image, from the webroot. |
| height |
numeric* |
Opt |
AUTO |
If size parameter is set to custom, you may pass in your desired height in pixels. Or, if passing in the width parameter, you may use AUTO, and Mura will maintain the aspect ratio of the original source image. |
| width |
numeric* |
Opt |
AUTO |
If size parameter is set to custom, you may pass in your desired width in pixels. Or, if passing in the height parameter, you may use AUTO, and Mura will maintain the aspect ratio of the original source image. |
| siteID |
string |
Opt |
SiteID of the current request context |
If you wish to obtain an image from another site hosted under the same instance of Mura, you may optionally pass the desired siteID. |
Usage
Use this function to output the path to a Mura image. If an invalid fileID is used, the result will be an empty string.
Examples
There are several ways you can use this method. Using Class Extensions (covered in the Mura Developer Guide), there could be any number of associated images to a content item. Using the fileID of any image, you can use the following examples to output an image.
The examples use a simple bit of CFML logic first, to make sure the image actually exists. For more information on the CFML tag cfif, please visit https://helpx.adobe.com/coldfusion/cfml-reference/coldfusion-tags/tags-i/cfif.html.
Large Image
The following example outputs a Large image of the current content item. This is very similar to the Get Associated Image example found under the content object section.
<cfoutput>
    <cfif Len(m.getURLForImage(fileid=m.content('fileid')))>
        <img src="#m.getURLForImage(fileid=m.content('fileid'))#">
    </cfif>
</cfoutput>
Medium Image
The following example outputs a Medium image of the current content item.
<cfoutput>
    <cfif Len(m.getURLForImage(fileid=m.content('fileid')))>
        <img src="#m.getURLForImage(fileid=m.content('fileid'), size='medium')#">
    </cfif>
</cfoutput>
Medium Image with Alt Attribute
The following example outputs a Medium image of the current content item, and populates the alt attribute of the <img> tag with the content item's Title.
<cfoutput>
    <cfif Len(m.getURLForImage(fileid=m.content('fileid')))>
        <img  src="#m.getURLForImage(fileid=m.content('fileid'), size='medium')#"
              alt="#esapiEncode('html_attr', m.content('title'))#">
    </cfif>
</cfoutput>
Site Placeholder Image
As covered under How to Manage Image Sizes, each site can have a Placeholder Image. This example demonstrates how to output a placeholder image.
<cfoutput>
    <cfif Len(m.getURLForImage(fileid=m.siteConfig('placeholderImgID')))>
        <img  src="#m.getURLForImage(fileid=m.siteConfig('placeholderImgID'))#">
    </cfif>
</cfoutput>
Display Site Placeholder Image if Associated Image Doesn't Exist
The example below is useful for when you want to output the placeholder image for content that doesn't have an associated image.
<cfoutput>
    <cfif Len(m.getURLForImage(fileid=m.content('fileid')))>
        <img  src="#m.getURLForImage(fileid=m.content('fileid'))#">
    <cfelseif Len(m.getURLForImage(fileid=m.siteConfig('placeholderImgID')))>
        <img src="#m.getURLForImage(fileid=m.siteConfig('placeholderImgID'))#">
    </cfif>
</cfoutput>
content
A Mura Scope object, (also referred to as a "subscope" of the Mura Scope), that provides access to several helper methods for the Content Item in the current request context, as well as easy access to its attributes.
Function Syntax
m.content( property, propertyValue )
Parameters
| Parameter |
Type |
Req/Opt |
Default |
Description |
| property |
string |
Opt |
|
Optionally pass in an attribute name, and Mura will return its value (unless a propertyValue is also provided). If the property parameter is omitted, Mura will return a content object, which has several helper methods associated to it.
|
| propertyValue |
any |
Opt |
|
If you pass in a property, you may optionally "set" the value of the property by passing in a value to this parameter. If you leave this parameter empty, Mura will return the actual value stored in the database for the requested property.
|
Usage
Use this function to "get" and/or "set" values of the content item. The content object also has a number of helper methods, very useful for theme developers, and are noted below under the Examples.
Examples
Note: Some of the examples below make use of esapiEncode to encode a given string for safe output to stop Cross Site Scripting attacks.
Content Title
The following example outputs the "Title" of the content item in the current request context.
<cfoutput>
    <h2>
        #esapiEncode('html', m.content('title'))#
   </h2>
</cfoutput>
HTML (Browser) Title
The following example outputs the "HTML (Browser) Title" of the content item in the current request context.
<cfoutput>
    <title>
        #esapiEncode('html', m.content('HTMLTitle'))#
    </title>
</cfoutput>
You could also combine this with the siteConfig's "Site Name" attribute, to have a full <title> for your theme's layout template.
<cfoutput>
    <title>
        #esapiEncode('html', m.content('HTMLTitle'))# -
        #esapiEncode('html', m.siteConfig('site'))#
   </title>
</cfoutput>
Content Summary
The following example outputs the "Summary" of the content item in the current request context.
<cfoutput>
    <article>
        #m.content('summary')#
   </article>
</cfoutput>
If you want Mura [m] Tags to render, you will want to wrap the output with m.setDynamicContent().
<cfoutput>
    <article>
        #m.setDynamicContent(m.content('summary'))#
   </article>
</cfoutput>
Date Created
This example outputs the date the content item was originally created on. For more information on the CFML tag DateFormat, please visit https://helpx.adobe.com/coldfusion/cfml-reference/coldfusion-functions/functions-c-d/DateFormat.html
<cfoutput>
    <p>
        Date Created: #DateFormat(m.content('created'), 'YYYY-MM-DD')#
   </p>
</cfoutput>
Date Last Updated
This example outputs the date the content item was last updated.
<cfoutput>
    <p>
        Date Last Updated: #DateFormat(m.content('lastUpdate'), 'YYYY-MM-DD')#
   </p>
</cfoutput>
Last Updated By
This example outputs the first and last name of the content manager who last updated the content item.
<cfoutput>
    <h2>
        Last Updated By: #esapiEncode('html', m.content('lastUpdateBy'))#
   </h2>
</cfoutput>
Credits (Author)
This example outputs the "Credits" attribute (from the Publishing tab).
<cfoutput>
    <h2>
        Author/Credits: #esapiEncode('html', m.content('credits'))#
   </h2>
</cfoutput>
Meta Description
This example shows how to output text entered into the Meta Description field.
<cfoutput>
    <meta name="description" content="#esapiEncode('html_attr', m.content('metaDesc'))#">
</cfoutput>
Meta Keywords
This example shows how to output text entered into the Meta Keywords field.
<cfoutput>
    <meta name="keywords" content="#esapiEncode('html_attr', m.content('metaKeywords'))#">
</cfoutput>
Get Associated Image
This example shows how to output the primary associated image of a content item. It uses a simple bit of CFML logic first, to make sure an image actually exists. For more information on the CFML tag cfif, please visit https://helpx.adobe.com/coldfusion/cfml-reference/coldfusion-tags/tags-i/cfif.html
<cfoutput>
    <cfif Len(m.content().getImageURL('medium'))>
        <img src="#m.content().getImageURL('medium')#">
    </cfif>
</cfoutput>
Inspecting Available Attributes
This example demonstrates how to inspect the available attributes of a content item. For more information the CFML tag cfdump, please visit https://helpx.adobe.com/coldfusion/cfml-reference/coldfusion-tags/tags-d-e/cfdump.html.
<cfdump var="#m.content().getAllValues()#">
component
A Mura Scope object, (also referred to as a "subscope" of the Mura Scope), that provides access to several helper methods for a Component Item in the current request context, as well as easy access to its attributes.
Function Syntax
m.component( property, propertyValue )
Parameters
| Parameter |
Type |
Req/Opt |
Default |
Description |
| property |
string |
Opt |
|
Optionally pass in an attribute name, and Mura will return its value (unless a propertyValue is also provided). If the property parameter is omitted, Mura will return a content object, which has several helper methods associated to it. Mura "components" are really just "content objects" which is why it returns a "content object" and not a "component object."
|
| propertyValue |
any |
Opt |
|
If you pass in a property, you may optionally "set" the value of the property by passing in a value to this parameter. If you leave this parameter empty, Mura will return the actual value stored in the database for the requested property.
|
Usage
Use this function to "get" and/or "set" values of the component item. The content/component object also has a number of helper methods, very useful for theme developers, and are noted below under the Examples.
Examples
Note: Some of the examples below make use of esapiEncode to encode a given string for safe output to stop Cross Site Scripting attacks.
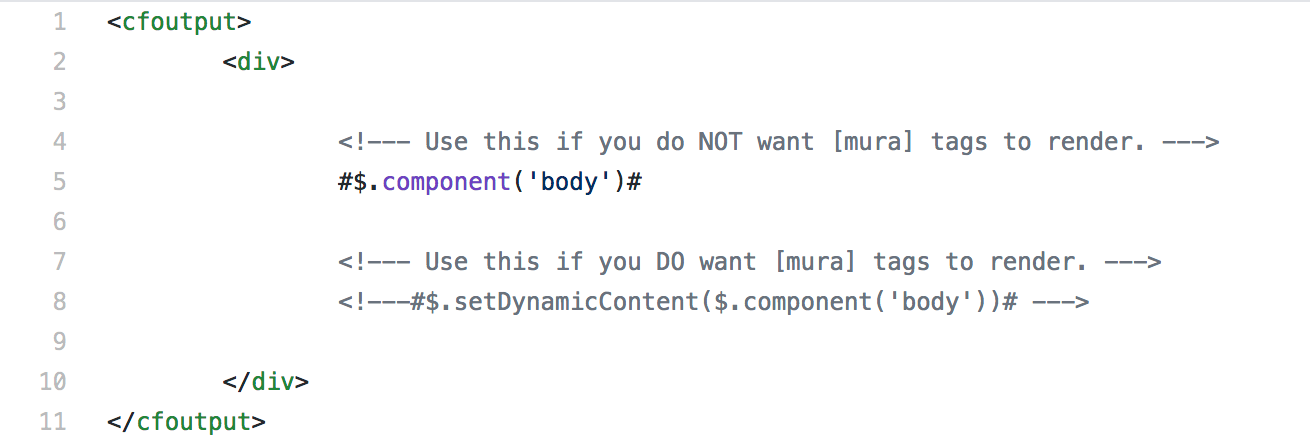
Component Body
The following example outputs the "Body/Content" of the component item in the current request context.
<cfoutput>
    <article>
        #m.component('body')#
   </article>
</cfoutput>
If you want Mura [m] Tags to render, you will want to wrap the output with m.setDynamicContent().
<cfoutput>
    <article>
        #m.setDynamicContent(m.component('body'))#
   </article>
</cfoutput>
Component Title
The following example outputs the "Title" of the component item in the current request context.
<cfoutput>
    <h2>
        #esapiEncode('html', m.component('title'))#
   </h2>
</cfoutput>
Date Created
This example outputs the date the content item was originally created on. For more information on the CFML tag DateFormat, please visit https://helpx.adobe.com/coldfusion/cfml-reference/coldfusion-functions/functions-c-d/DateFormat.html
<cfoutput>
    <p>
        Date Created: #DateFormat(m.component('created'), 'YYYY-MM-DD')#
   </p>
</cfoutput>
Date Last Updated
This example outputs the date the component item was last updated.
<cfoutput>
    <p>
        Date Last Updated: #DateFormat(m.component('lastUpdate'), 'YYYY-MM-DD')#
   </p>
</cfoutput>
Last Updated By
This example outputs the first and last name of the content manager who last updated the component item.
<cfoutput>
    <h2>
        Last Updated By: #esapiEncode('html', m.component('lastUpdateBy'))#
   </h2>
</cfoutput>
Inspecting Available Attributes
This example demonstrates how to inspect the available attributes of a component item. For more information the CFML tag cfdump, please visit https://helpx.adobe.com/coldfusion/cfml-reference/coldfusion-tags/tags-d-e/cfdump.html.
<cfdump var="#m.component().getAllValues()#">
siteConfig
A Mura Scope object, (also referred to as a "subscope" of the Mura Scope), that provides access to several helper methods for the Site Settings in the current request context, as well as easy access to its attributes.
Function Syntax
m.siteConfig( property, propertyValue )
Parameters
| Parameter |
Type |
Req/Opt |
Default |
Description |
| property |
string |
Opt |
|
Optionally pass in an attribute name, and Mura will return its value (unless a propertyValue is also provided). If the property parameter is omitted, Mura will return a site settings object, which has several helper methods associated to it.
|
| propertyValue |
any |
Opt |
|
If you pass in a property, you may optionally "set" the value of the property by passing in a value to this parameter. If you leave this parameter empty, Mura will return the actual value stored in the database for the requested property.
|
Usage
Use this function to "get" and/or "set" values of the Site Settings. The siteConfig object also has a number of helper methods, very useful for theme developers, and are noted below under the Examples.
Examples
Note: Some of the examples below make use of esapiEncode to encode a given string for safe output to stop Cross Site Scripting attacks.
Theme Asset Path
The following example outputs the a relative path to where your site's theme files reside on the server.
<cfoutput>
    <p>
        #m.siteConfig('themeAssetPath')#
    </p>
</cfoutput>
This is useful for when you may want to create dynamic links to your theme's CSS files. Otherwise, you would have to hard-code the path yourself, which makes it difficult for long-term maintenance since your theme could be hosted in different environments, and the paths could be completely different. For example, if you want to include your theme's CSS, you could use the following code example.
<cfoutput>
    <!--- Your Theme's Styles --->
    <link rel="stylesheet" href="#$.siteConfig('themAssetPath')#/css/your-styles.css">
</cfoutput>
Site Name
The following example outputs the "Site Name" of the site being accessed in the current request context.
<cfoutput>
    <header>
        <a class="navbar-brand" href="/">
            #esapiEncode('html', m.siteConfig('site'))#
        </a>
    </header
</cfoutput>
Site Tagline
The following example outputs the "Site Tagline" of the site being accessed in the current request context.
<cfoutput>
    <header>
        <p>
            #esapiEncode('html', m.siteConfig('tagline'))#
        </p>
    </header
</cfoutput>
Site ID
The following example outputs the "Site ID" of the site being accessed in the current request context.
<cfoutput>
    #esapiEncode('html', m.siteConfig('siteID'))#
</cfoutput>
Domain
The following example outputs the "Domain" of the site being accessed in the current request context.
<cfoutput>
    #esapiEncode('html', m.siteConfig('domain'))#
</cfoutput>
Inspecting Available Attributes
This example demonstrates how to inspect the available attributes of the Site Settings. For more information the CFML tag cfdump, please visit https://helpx.adobe.com/coldfusion/cfml-reference/coldfusion-tags/tags-d-e/cfdump.html.
<cfdump var="#m.siteConfig().getAllValues()#">