How To Use Amazon S3 For File Storage
If you haven't already done so, you will have to set up an Amazon S3 account. Then, follow the steps below to use Amazon S3 to store Mura CMS assets in the cloud.
Note: This is something you should set up before anyone has created any content in Mura. Also, these settings apply to all sites under the Mura CMS installation.
Create Amazon S3 Bucket
First, we need to create an Amazon S3 Bucket to store Mura CMS assets.
- Go to the S3 area of your Amazon console.
- Create a bucket to store your Mura CMS assets.
- Select the bucket, then click the "Properties" button.
- Then, click on "Permissions"
- Click "Add bucket policy"
- Using the "Bucket Policy Editor" you can use the sample policy below, or create your own. This is very important, because this policy will allow any assets within the bucket to be viewed on your website. Without this policy, you will get an "AccessDenied" message when attempting to access any assets anonymously.
{ "Id": "SampleMuraCMSPolicy", "Statement": [ { "Sid": "ReadOnlyPermToAnonymousUser", "Action": "s3:GetObject", "Effect": "Allow", "Resource": "arn:aws:s3:::YourBucketName/*", "Principal": { "AWS": [ "*" ] } }, { "Sid": "RestrictAccessToSpecificHTTPReferrer", "Action": "s3:*", "Effect": "Allow", "Principal": { "AWS": [ "*" ] }, "Resource": "arn:aws:s3:::YourBucketName/*", "Condition": { "StringLike": { "aws:Referer": [ "http://www.yourdomain.com/*", "http://yourdomain.com/*" ] } } } ] } - Click "Save"
Congratulations! You have successfully created a bucket to store Mura CMS assets, and allow end users to view these assets with the blanket "Bucket Policy."
Create Amazon S3 User Account
Next, we need to create a special Amazon S3 User account for Mura CMS, and apply the appropriate "User Policy" so Mura will be able to create and modify assets in the bucket.
- Go to the IAM (Identity and Access Management) area of your Amazon console.
- Click on "Users" and then "Create New Users."
- Enter a User Name. Then click "Create."
- You should be on a screen that will allow you to view and download the credentials.
- You will need the Access Key ID and Secret Access Key information!
- When done, go back to the list of Users, and select the new user account you've created.
- You will now need to "Attach User Policy" so that this account can create, delete, and modify assets where needed. Here's a sample policy that essentially allows Mura CMS all access:
{ "Version": "2012-10-17", "Statement": [ { "Effect": "Allow", "Action": "s3:*", "Resource": "*" } ] } - You could also simply "Select Policy Template" and then scroll to the "Amazon S3 Full Access" policy, then click the "Select" button.
- Then, click "Apply Policy."
Well done! You have created a user account, with the permissions needed for Mura to add/modify assets on Amazon S3.
Create Mapped Drive to Amazon S3
This is a critical piece of the puzzle. You will most likely need to install some software that allows you to create a mapped drive on your server to your Amazon S3 account. There are several options available such as S3FS-FUSE (File System in User Space), TntDrive (Windows Only), and CloudBerry Drive Server (Windows Only).
For testing on your local machine, in addition to some of the options listed above, you could try something like ExpanDrive (available for Mac & Windows), which connects to several other cloud hosting services as well.
Once you've setup your mapping, you should then be ready to proceed.
Add Mapped Drive Info To Mura CMS
Finally, we need to add the drive mapping information so that Mura can locate, create and modify assets.
- Open the file located under
{MuraRoot}/config/settings.ini.cfm - Locate, and update the following settings as listed below with the credentials you obtained when creating the user acount above:
{MuraRoot}/config/settings.ini.cfm
filestore=fileDir
filedir=/YourMappedDrive
assetdir=/YourMappedDrive
assetpath=http://yourbucketname.s3.amazonaws.com
usefilemode=false
defaultfilemode=777
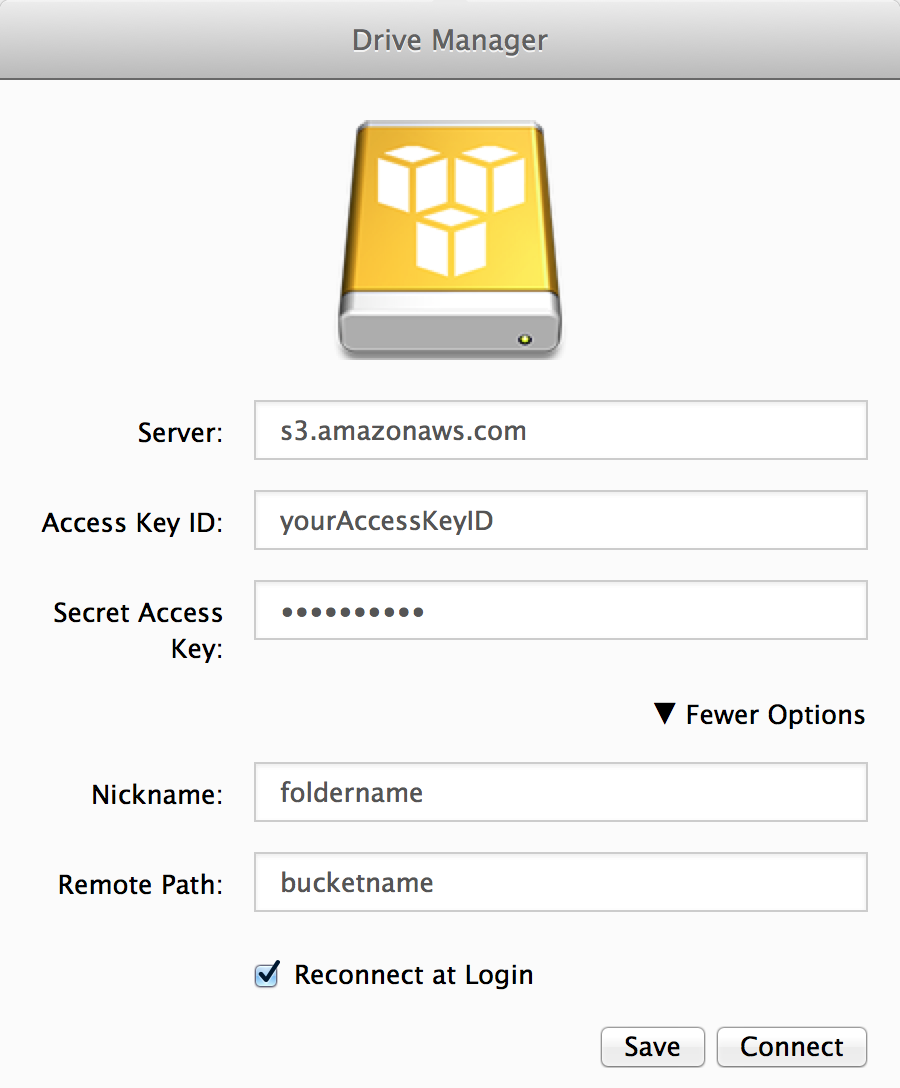
For example, if you're using ExpanDrive, with the following configuration:

Your
settings.ini.cfmfile would look like this:filedir=/Volumes/foldername assetdir=/Volumes/foldername assetpath=http://bucketname.s3.amazonaws.com
- Go to the Mura CMS Administration area, and Reload Application for the settings to take effect.
You should now be able to test your setup by creating a Page, adding a Primary Associated Image, and adding an image to the Body area. Publish, then preview the content via the front end of your site.