How To Setup A Separate Authoring And Public Environment
There are a multitude of options when it comes to configuring your Mura CMS network environment. The most common scenario is where Content Managers have access to the "Admin" area and site visitors see the public-facing side of the same Mura CMS installation, typically hosted on the same server (or clustered/load-balanced servers). However, we understand that for security reasons, you may wish to completely remove any content administration capabilities from the publicly available site altogether.
This document addresses one option for creating a "Production" environment that has a separate authoring environment, and public-facing server. It's actually fairly simple to implement, as seen in the diagram below.
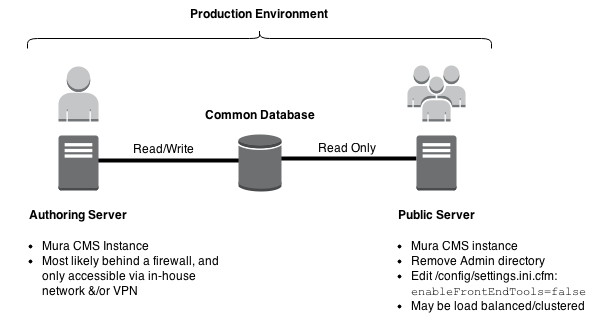
The "Production Environment" consists of:
- Common Database
- Authoring Server
- Public Server
Common Database (DB)
There is only one (1) database, which is shared by both the Authoring Server, and Public Server.
Authoring Server
The Authoring Server has its own instance of Mura CMS, and the CFML datasource should point to the Common DB. This server typically sits behind a firewall, and may only be accessed if logged into the same network or via Virtual Private Network (VPN).
One issue you will want to address here is the assets such as images and files uploaded via both the editor window, and files/images that are being added as "Primary Associated Images" or content items in Mura. One option is that you can refer to the article on How To Run Mura On Load Balanced Servers for information on keeping files in sync across your servers. You could also refer to our guide on How To Use Amazon S3 For File Storage, which you would use for both the Authoring and Public Servers. In addition, you could create a mapped/mounted drive to the install on your public server.
For example:
- Open the file located under
{MuraRoot}/config/settings.ini.cfm - Located and update the following settings as listed below with your mapped/mounted drive information:
{MuraRoot}/config/settings.ini.cfm
filestore=fileDir
filedir=/YourMappedDrive
assetdir=/YourMappedDrive
assetpath=http://www.yourPublicDomain.com
usefilemode=false
defaultfilemode=777
- Go to the Mura CMS Administration area, and Reload Application for the settings to take effect.
Public Server
The Public Server has its own instance of Mura CMS, and the CFML datasource should point to the Common DB. The Public Server simply needs "Read Only" acces to the database. The server may also sit behind a firewall, but the domain is publicly accessible (or not, if being used as a private Intranet).
You should completely remove the {MuraRoot}/admin directory. In addition to that, edit the {MuraRoot}/config/settings.ini.cfm file with the following to prevent any errors that may occur if a content manager attempts to login:
enableFrontEndTools=false
Then, reload Mura CMS for the settings to take effect.
Other
This document does not address networking concerns such as firewalls, etc. since there is a plethora of resources available to address those concerns.
Dev/QA Environment
In your Dev and/or QA Environment(s), you may have another server with its own installation of Mura CMS, and a completely separate database. We suggest periodically cloning the "Authoring" server and "Common Database" to "Dev/QA" before adding any new functionality, etc.
We also encourage you to use a version control system (VCS) such as Git or SVN for your filesystem. This would allow you to keep your Core and Site files up-to-date, in addition to enabling you a way to safely make enhancements to your site. By using a VCS, you could then use a post-commit hook to push any changes to the "Production" environment's "Authoring" and "Public" servers.